After moving to Public cloud AWS , most of dba have doubts on what changes after moving cloud and how to manage database on AWS .
Since i am preparing for AWS exam and getting more insight , i thought of documenting key things that dba need to know to manage database on AWS .
On Aws dataguard feature can be achieved using replicas and Rac feature can be achieved using ami -- amazon managed image
#################################################
Creating Your First RDS DB Instance Running the Oracle Database Engine
This option enables you to create an instance with default settings and configurations for faster deployment.

1. In the AWS Management Console, select the RDS console.
2. Select your desired AWS Region from the
upper right corner.
3. Select Databases and
click Create database.
4. Specify your database options as follows:
- Creation method: Standard
Create
- Engine options: Oracle
- Edition: Select the edition you wish to use.
- Version: Select your desired version.
If you want to use the
instance in production you also need to define configurations for
deployment failover,
provisioned IOPS storage, and deletion protection.
6. Enter your master password. This password is automatically generated by default.
If you would prefer to set this password yourself, you can do the following:
Click Credential Settings in your Settings section.
Uncheck Auto-generate a password.
Enter and confirm your desired password.
8. Once your settings are configured, click Create database.
9. If you left the auto-generated password option checked, this is the only time you will be able to see that
password so make sure you note it. You can view this information via View credential details on your Databases page.
10. After your instance is created you can assign it a name and view all relevant information in the console.
- #################################################
#################################################
Cross-Region Read Replicas for Amazon RDS

Amazon RDS Read Replicas provide enhanced performance and durability for database (DB) instances.
Its option for scaling .
Cross-region
read replicas can yield tremendous performance benefits for read-only
applications for users based out in multiple regions. This feature gives
organizations to scale geographically as AWS has its services in many regions
of the world. Amazon RDS allows up to five in-region and cross-region replicas
per source with a single API call or a couple of clicks in the AWS Management
Console.
Common use cases for
cross-region read replicas can best be described as cross-region disaster
recovery model, scale out globally, or migrate an existing database to a new
region. Let’s examine the benefits:
Disaster recovery: Having the read replica
and the master on different regions, you will be able to promote the replica to
the new master in case a region gets completely disrupted due to unavoidable
circumstances. This helps keep the business operational during emergencies.
Scale out globally: If your application has a
user base that is spread out all over the planet, you can use cross-region read
replicas to serve read queries from an AWS region that is close to the user.
Region migration: Cross-region read
replicas make it easy for you to migrate your application from one AWS region
to another. Simply create the replica, ensure that it is current, promote it to
be a master database instance, and point your application to it.
The cross-region replicas
are very easy to create. You simply select the desired region (and optional
availability zone) in the AWS
Management Console from
the Instance Actions menu.
Before we proceed to create read replica we need to create VPC and subnet group as per requirement .
- Read Replicas helps in decreasing load on the primary DB by serving read-only traffic.
- You can create Read Replicas within AZ, Cross-AZ or Cross-Region.
- Read Replica can be manually promoted as a standalone database instance.
- Read Replicas support Multi-AZ deployments.
- You can use Read Replicas to take logical backups, if you want to store the backups externally to RDS.
- You can have Read Replicas of Read Replicas.
- Read Replica helps to maintain a copy of databases in a different region for disaster recovery.
- You can have up to five Read Replicas per master, each with own DNS endpoint. Unlike a Multi-AZ standby replica, you can connect to each Read Replica and use them for read scaling.
#################################################
#################################################
Creating AWS console user in IAM for console access .
2) Click Create New Users
Enter a username which makes sense. Like
Firstname.Lastname
or
FirstnameL
Click create for the user. Don't bother generating Access Keys for this new user, they can generate their own later on.


#################################################
To modify a DB parameter group
Sign in to the AWS Management Console and open the Amazon RDS console at https://console.aws.amazon.com/rds/.
In the navigation pane, choose Parameter groups.
In the list, choose the parameter group that you want to modify.
For Parameter group actions, choose Edit.
Change the values of the parameters that you want to modify. You can scroll through the parameters using the arrow keys at the top right of the dialog box.
You can't change values in a default parameter group.
Choose Save changes.
#################################################
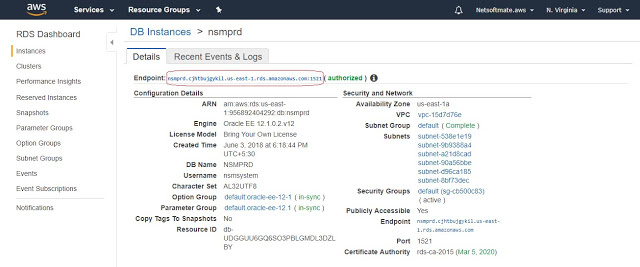
Connecting aws rds oracle database using tns :
- Sign in to the AWS Management Console and open the Amazon RDS console at https://console.aws.amazon.com/rds/.
- In the upper-right corner of the console, choose the AWS Region of your DB instance.
- Find the DNS name and port number for your DB Instance.
- Choose Databases to display a list of your DB instances.
- Choose the Oracle DB instance name to display the instance details.
- On the Connectivity & security tab, copy the endpoint. Also, note the port number. You need both the endpoint and the port number to connect to the DB instance.
For you to connect to your DB instance, it must be associated with a security group that contains the IP addresses and network configuration that you use to access the DB instance. You might have associated your DB instance with an appropriate security group when you created it. If you assigned a default, non configured security group when you created the DB instance, the DB instance firewall prevents connections.
If you need to create a new security group to enable access, the type of security group that you create depends on which Amazon EC2 platform your DB instance is on. To determine your platform, see Determining whether you are using the EC2-VPC or EC2-Classic platform. In general, if your DB instance is on the EC2-Classic platform, you create a DB security group; if your DB instance is on the VPC platform, you create a VPC security group. For information about creating a new security group, see Controlling access with security groups.
After you create the new security group, you modify your DB instance to associate it with the security group. For more information, see Modifying an Amazon RDS DB instance.
You can enhance security by using SSL to encrypt connections to your DB instance. For more information, see Oracle Secure Sockets Layer.
#################################################
#################################################
Ensure that RDS clusters are using Multi-AZ deployment
configurations for high availability and automatic failover support fully
managed by AWS.
Enabling this option is really simple and provides great
advantages to prevent an affected availability area can leave your database
without service.

#################################################
#################################################
Multi-Availability Zone (Multi-AZ) RDS Deployments
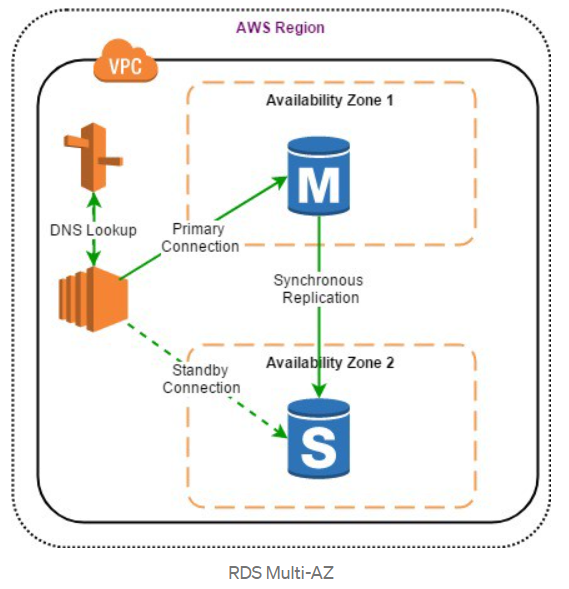
When Multi-AZ is enabled for MySQL, MariaDB,
Oracle, and PostgreSQL engines, AWS automatically provisions and maintains a
synchronous database standby replica on a dedicated hardware in a separate data
center (known as Availability Zone, or AZ). When deploying SQL Server in a Multi-AZ infrastructure, a
SQL server engine can be configured to use SQL-Server native mirroring
technology for synchronous logical replication. AWS RDS will automatically
switch from the primary instance to the available standby replica in the event
of a failure, such as an Availability Zone outage, an internal hardware or
network outage, a software failure; or in case of planned interruptions, such
as software patching or changing the RDS instance type.
SSDs
are not only durable in terms of read and write throughput, but also
cost-effective, high-performance robust storage devices for database workloads.
Amazon Aurora/RDS uses SSD-backed virtual storage layer for all its database
services. Amazon Aurora automatically replicates the storage volume six ways
across three Availability Zones, making it extremely durable and fault-tolerant.
Multi-AZ
increases durability and availability of the databases and is most suitable for
production deployments. If an Availability Zone failure or DB instance failure
occurs, the availability impact is limited to the time automatic failover takes
to complete, which is typically under one minute for Amazon Aurora and one to
two minutes for other database engines. When operations such as DB instance
scaling or system upgrades such as OS patching are initiated for Multi-AZ
deployments, it is applied on the standby prior to an automatic failover. As a
result, the availability impact is limited only to the time required for
automatic failover to complete.
Benefits of Multi-AZ deployment:
- Replication to a standby replica is synchronous which is highly durable.
- Endpoint of DB instance remains the same after a failover, the application can resume database operations without manual intervention.
- If a failure occurs, your availability impact is limited to time that automatic failover takes to complete. This helps to achieve increased availability.
- It reduces the impact of maintenance. RDS performs maintenance on the standby first, promotes the standby to primary master, and then performs maintenance on the old master which is now a standby replica.
- To prevent any negative impact of the backup process on performance, Amazon RDS creates a backup from the standby replica.
- When a problem is detected on the primary instance, it will automatically failover to the standby in the following conditions: 1) The primary DB instance fails. 2) An Availability Zone outage. 3) The DB instance server type is changed. 4) The operating system of DB instance is undergoing software patching. 5) Manual failover of DB instance was initiated using reboot with failover.
#################################################
#################################################
Snapshot Backup and Restore database

RDS provides two different methods Automated and Manual for backing up your DB instances .
- Backups of the DB instance are automatically created and retained
- Automated backups are enabled by default for a new DB instance.
- Automated backups occur during a daily user-configurable period of time, known as preferred backup window.
- If a preferred backup window is not specified when an DB instance is created, RDS assigns a default 30-minute backup window which is selected at random from an 8-hour block of time per region.
- Changes to the backup window take effect immediately.
- Backup window cannot overlap with the weekly maintenance window for the DB instance.
- Backups created during the backup window are retained for a user-configurable number of days , known as backup retention period
- If the backup retention period is not set, RDS defaults the period retention period to one day, if created using RDS API or the AWS CLI, or seven days if created AWS Console
- Backup retention period can be modified with valid values are 0 (for no backup retention) to a maximum of 35 days.
- Manual snapshot limits (50 per region) do not apply to automated backups
- If the backup requires more time than allotted to the backup window, the backup will continue to completion.
- An immediate outage occurs if the backup retention period is changed
- from 0 to a non-zero value as the first backup occurs immediately or
- from non-zero value to 0 as it turns off automatic backups, and deletes all existing automated backups for the instance.
- RDS uses the periodic data backups in conjunction with the transaction logs to enable restoration of the DB Instance to any second during the retention period, up to the LatestRestorableTime (typically up to the last few minutes).
- During the backup window,
- for Single AZ instance, storage I/O may be briefly suspended while the backup process initializes (typically under a few seconds) and a brief period of elevated latency might be experienced.
- for Multi-AZ DB deployments, there is No I/O suspension since the backup is taken from the standby instance
- First backup is a full backup, while the others are incremental.
- Automated DB backups are deleted when
- the retention period expires
- the automated DB backups for a DB instance is disabled
- the DB instance is deleted
- When a DB instance is deleted,
- a final DB snapshot can be created upon deletion; which can be used to restore the deleted DB instance at a later date.
- RDS retains the final user-created DB snapshot along with all other manually created DB snapshots
- all automated backups are deleted and cannot be recovered
Point-In-Time Recovery
- In addition to the daily automated backup, RDS archives database change logs. This enables recovery of the database to any point in time during the backup retention period, up to the last five minutes of database usage.
- Disabling automated backups also disables point-in-time recovery
- RDS stores multiple copies of your data, but for Single-AZ DB instances these copies are stored in a single availability zone.
- If for any reason a Single-AZ DB instance becomes unusable, point-in-time recovery can be used to launch a new DB instance with the latest restorable data
- DB snapshots are manual, user-initiated backups that enables to back up a DB instance to a known state, and restore to that specific state at any time
- RDS keeps all manual DB snapshots until explicitly deleted
Restore a DB instance from a DB snapshot
2) In the navigation pane, choose Snapshots.
3) Choose the DB snapshot that you want to restore from.
4) For Actions, choose Restore Snapshot.
Note: This will create a new instance with the existing configuration of the instance from which the snapshot has been taken
5) On the Restore DB Instance page, for DB Instance Identifier, enter the name for your restored DB instance.
6) Choose Restore DB Instance.
#################################################
#################################################
Applying Oracle Psu patch on Aws rds
A minor version upgrade applies an Oracle Database Patch Set Update (PSU) or Release Update (RU) in a major version.
An Amazon RDS for Oracle DB instance is scheduled to be upgraded automatically during its next maintenance window when it meets the following condition:
The DB instance has the Auto minor version upgrade option enabled.
The DB instance is not running the latest minor DB engine version.
01Login to the AWS Management Console.
02Navigate to RDS dashboard at https://console.aws.amazon.com/rds/.
03In the navigation panel, under RDS Dashboard, click Instances.
04Select the RDS instance that you want to examine.
05Click Instance Actions button from the dashboard top menu and select See Details.
06Under Maintenance Details section, search for the Auto Minor Version Upgrade status:
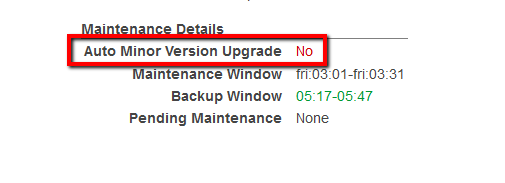
If the current status is set to No, the feature is not enabled and the minor engine upgrades released will not be applied to the selected RDS instance.
07Repeat steps no. 4 – 6 for each RDS instance provisioned in the current region. Change the AWS region from the navigation bar to repeat the process for other regions
https://docs.aws.amazon.com/AmazonRDS/latest/UserGuide/USER_UpgradeDBInstance.Oracle.html
#################################################
#################################################
Amazon RDS Resources Encryption
Compliance is one of the key concerns for DBAs whose data is on the cloud. When dealing with production databases that hold sensitive and critical data, it is highly recommended to implement encryption in order to protect the data from unauthorized access. With RDS encryption enabled, the data stored on the instance underlying storage, the automated backups, read replicas, and snapshots all become encrypted. The RDS encryption keys implement the AES-256 algorithm and are entirely managed and protected by the AWS key management infrastructure through AWS Key Management Service (AWS KMS).
Options for encryption of data
at rest provided by AWS are as listed below:
RDS for Oracle Database –
AWS-managed keys for Oracle Enterprise Edition (EE)
RDS for SQL Server – AWS-managed
keys for SQL Server Enterprise Edition (EE)
RDS for MySQL – Customer-managed
keys using AWS Key Management Service (KMS)
RDS for PostgreSQL –
Customer-managed keys using AWS Key Management Service (KMS)
RDS for Oracle Database –
Customer-managed keys for Oracle Enterprise Edition using AWS CloudHSM
For all of the above-listed
database engines and key management options, encryption (AES-256) and
decryption are applied both automatically and transparently to RDS storage and
database snapshots. You do not need to make any changes to your code or
operating model in order to benefit from this important data protection
feature. AWS
CloudHSM is
a service that helps meet stringent compliance requirements for cryptographic
operations and storage of encryption keys by using a single tenant Hardware Security Module (HSM) appliances within the AWS
cloud. To learn more, read the documentation on Encrypting
RDS Resources
#################################################
Encrypt your database
Ensure that RDS database instances are encrypted to
fulfill compliance requirements for data-at-rest encryption. The RDS data
encryption and decryption is handled transparently and don’t require any
additional action from you or your application, you just need to select the
Master Key which is going to encrypt the instance.
To enable data encryption for an existing RDS instance
you need to re-create it (back-up and restore) with encryption flag enabled, as
you can see below:

Enable RDS instance encryption in Edit view.
#################################################
#################################################
Go to the RDS console and select the region your database is in. Click on the Show Monitoring button and pick your database instance. There will be a graph (like below image) that shows Free Storage Space.
This is documented over at AWS RDS documentation.

#################################################
#################################################

- Sign in to the AWS Management Console and open the Amazon RDS console at https://console.aws.amazon.com/rds/
- In the navigation pane, choose Databases.
- Choose the DB instance that you want
to modify.
- Choose Modify.
- Enter a new value for Allocated storage. It must be greater than the current value.
- Choose Continue to move to the next screen.
- Choose Apply immediately in the Scheduling of modifications section to apply the storage changes to the DB instance immediately. Or choose Apply during the next scheduled maintenance window to apply the changes during the next maintenance window.
- When the settings are as you want them, choose Modify DB instance
Note
When you increase the allocated storage, it must be by at least 10 percent. If you try to increase the value by less than 10 percent, you get an error.
#################################################
AWS Database Migration Service (DMS)
AWS DMS can help DBAs in planning and migration of on-premises
relational data stored in Oracle, SQL Server, MySQL, MariaDB, or PostgreSQL
databases. DMS can help in migrating to cloud in virtually no downtime so you
can take advantage of the scale, operational efficiency, and the multitude of
data storage options available. DMS works by setting up and then managing a
replication instance on AWS. This instance unloads data from the source
database and loads it into the destination database, and can be used for a
one-time migration followed by ongoing replication to support a migration that
entails minimal downtime. DBAs can set up their first migration with just a
couple of clicks. The process can be started by DMS Console as shown below:

It provides a
step-by-step process to set up the migration. The screenshot below gives an
overview of the entire process.

What each step means: DMS requires at least a source,
a target, and a replication instance.
Source database: An on-premises or EC2
instance-based database.
Target database: Target database is the actual
AWS RDS database to which the source database has to be migrated.
Replication instance: Processes the migration
tasks.
Replication task: Once configuration of the
source database and target databases using connection details like DB name,
hostname, port, username, and password is completed, the replication tasks are
created. It contains one or more table mappings that define what data is being
moved from the source to the target. If a table does not exist in the target,
then it can be automatically created. The AWS Database Migration Service offers
many options. For example, you can choose to migrate specific tables. You can
also create several different types of replication tasks and activate them at
different times. Step-by-step DMS
documentation can
be very useful before starting the process
#################################################
#################################################
Amazon RDS Oracle doesn't support the following Oracle Database features:
- Automatic Storage Management (ASM)
- Database Vault
- Flashback Database
- Multitenant
- Oracle Enterprise Manager Cloud Control Management Repository
- Real Application Clusters (Oracle RAC)
- Real Application Testing
- Unified Auditing, Pure Mode
- Workspace Manager (WMSYS) schema
#################################################
Amazon RDS Oracle supports the following Oracle Database features:
- Advanced Compression
- Application Express (APEX)
- Automatic Memory Management
- Automatic Undo Management
- Automatic Workload Repository (AWR)
- Active Data Guard with Maximum Performance in the same AWS Region or across AWS Regions
- Continuous Query Notification (version 12.1.0.2.v7 and later
- Data Redaction
- Database Change Notification (version 11.2.0.4.v11 and later 11g versions)
- Database In-Memory (version 12.1 and later)
- Distributed Queries and Transactions
- Edition-Based Redefinition
- Enterprise Manager Database Control (11g) and EM Express (12c)
- Fine-Grained Auditing
- Flashback Table, Flashback Query, Flashback Transaction Query
- Import/export (legacy and Data Pump) and SQL*Loader
- Java Virtual Machine (JVM)
- Label Security (version 12.1 and later)
- Locator
- Materialized Views
- Multimedia
- Network encryption
- Partitioning
- Spatial and Graph
- Star Query Optimization
- Streams and Advanced Queuing
- Summary Management – Materialized View Query Rewrite
- Text (File and URL data store types are not supported)
- Total Recall
- Transparent Data Encryption (TDE)
- Unified Auditing, Mixed Mode (version 12.1 and later)
- XML DB (without the XML DB Protocol Server)
- Virtual Private Database
#################################################
Monitoring Using Amazon CloudWatch
Monitoring is an important part of maintaining the reliability,
availability, and performance of Amazon RDS or any database system. DBAs need
to put a plan in place to oversee databases on RDS in order to monitor network
throughput, I/O for read, write, or metadata operations, client connections,
and keep track of historical performance KPIs to use as a baseline for
comparison with current performance. Additionally, Amazon RDS provides multiple
ways to manage automation of many DBA activities and has many different
capabilities to do detailed performance analysis of the overall system. Let’s
look at some of the monitoring techniques that Amazon RDS provides.
Using Amazon CloudWatch, DBAs can automate most monitoring
tasks. CloudWatch collects and processes raw data from Amazon RDS into
readable, near real-time metrics. These statistics are recorded for a period of
two weeks so DBAs can maintain a historical performance statistics of
databases. Using AWS Console, DBAs can find the metrics related to
RDS. The screenshot below shows how many RDS metrics produced by database engines can
be monitored.

You can also use
CloudWatch Alarms for single metrics to take actions such as sending a
notification to a concerned person or autoscaling policies, which in turn may
automatically handle an increase in load by adding additional resources.
Enhanced Monitoring
Advanced RDS DBAs may
want to have more insight into the inner workings of database services. Once
the RDS Enhanced Monitoring feature for a database instance is enabled, DBAs
gain access to more than 50 new CPU, memory, file system, and disk I/O metrics.
DBAs can enable these features on a per-instance basis and can choose the
granularity (all the way down to one second). Here is the list of available
metrics:

#################################################
#################################################
Deletion protection is now enabled by default when you select the "production" option for database instances created through the AWS Console. You can also turn on or off deletion protection for an existing database instance or cluster with a few clicks in the AWS Console or the AWS Command Line Interface. Deletion protection is enforced in the AWS Console, the CLI, and API.

#################################################
#################################################
Make sure database is not public

#################################################
#################################################
#################################################
#################################################
#################################################
#################################################
SQL> BEGIN
rdsadmin.rdsadmin_rman_util.backup_database_full(
p_owner => ‘SYS’,
p_directory_name => ‘BKP_DIR’,
p_level => 0, — 0 For FULL, 1 for Incremental
–p_parallel => 4, — To be hashed if using a Standard Edition
p_section_size_mb => 10,
p_rman_to_dbms_output => TRUE);
END;
/
SQL> BEGIN
rdsadmin.rdsadmin_rman_util.backup_archivelog_all(
p_owner => ‘SYS’,
p_directory_name => ‘BKP_DIR’,
–p_parallel => 6, — To be hashed if using a Standard Edition
p_rman_to_dbms_output => TRUE);
END;
/
SQL> BEGIN
rdsadmin.rdsadmin_rman_util.backup_archivelog_date(
p_owner => ‘SYS’,
p_directory_name => ‘BKP_DIR’,
p_from_date => ’01/15/2020 00:00:00′,
p_to_date => ’01/16/2020 00:00:00′,
–p_parallel => 4, — To be hashed if using a Standard Edition
p_rman_to_dbms_output => TRUE);
END;
/
SQL> SELECT to_char (start_time,’DD-MON-YY HH24:MI’) START_TIME, to_char(end_time,’DD-MON-YY HH24:MI’) END_TIME, time_taken_display, status,
input_type, output_device_type,input_bytes_display, output_bytes_display, output_bytes_per_sec_display,COMPRESSION_RATIO COMPRESS_RATIO
FROM v$rman_backup_job_details
WHERE status like ‘RUNNING%’;
SQL> SELECT t.name AS “TB_NAME”, d.file# as “DF#”, d.name AS “DF_NAME”, b.status
FROM V$DATAFILE d, V$TABLESPACE t, V$BACKUP b
WHERE d.TS#=t.TS#
AND b.FILE#=d.FILE#
AND b.STATUS=’ACTIVE’;
SQL> BEGIN
rdsadmin.rdsadmin_rman_util.validate_database(
p_validation_type => ‘PHYSICAL+LOGICAL’,
–p_parallel => 2, — To be hashed if running a Standard Edition
p_section_size_mb => 10,
p_rman_to_dbms_output => TRUE);
END;
/
SQL> SELECT status, filename FROM V$BLOCK_CHANGE_TRACKING;
SQL> EXEC rdsadmin.rdsadmin_rman_util.enable_block_change_tracking;
SQL> EXEC rdsadmin.rdsadmin_rman_util.disable_block_change_tracking;
SQL> EXEC rdsadmin.rdsadmin_rman_util.crosscheck_archivelog(p_delete_expired => TRUE, p_rman_to_dbms_output => TRUE);
#################################################
#################################################
Skipping Corrupted Blocks procedure on
RDS
In case you have a corrupted blocks on a table/index whenever any query try to access those corrupted blocks it will keep getting ORA-1578
SQL> Select relative_fno,owner,segment_name,segment_type
from dba_extents
where
file_id = <DATAFILE_NUMBER_IN_THE_ERROR_MESSAGE_HERE>
and
<CORRUPTED_BLOCK_NUMBER_IN_THE_ERROR_MESSAGE_HERE> between block_id and block_id + blocks – 1;
exec rdsadmin.rdsadmin_dbms_repair.create_repair_table;
exec rdsadmin.rdsadmin_dbms_repair.create_orphan_keys_table;
exec rdsadmin.rdsadmin_dbms_repair.purge_repair_table;
exec rdsadmin.rdsadmin_dbms_repair.purge_orphan_keys_table;
set serveroutput on
declare v_num_corrupt int;
begin
v_num_corrupt := 0;
rdsadmin.rdsadmin_dbms_repair.check_object (
schema_name => ‘&corrupted_Object_Owner’,
object_name => ‘&corrupted_object_name’,
corrupt_count => v_num_corrupt
);
dbms_output.put_line(‘number corrupt: ‘||to_char(v_num_corrupt));
end;
/
col repair_description format a30
select object_name, block_id, corrupt_type, marked_corrupt, corrupt_description, repair_description from sys.repair_table;
begin
rdsadmin.rdsadmin_dbms_repair.skip_corrupt_blocks (
schema_name => ‘&corrupted_Object_Owner’,
object_name => ‘&corrupted_object_name’,
object_type => rdsadmin.rdsadmin_dbms_repair.table_object,
flags => rdsadmin.rdsadmin_dbms_repair.skip_flag);
end;
/
rdsadmin.rdsadmin_dbms_repair.skip_corrupt_blocks (
schema_name => ‘&corrupted_Object_Owner’,
object_name => ‘&corrupted_object_name’,
object_type => rdsadmin.rdsadmin_dbms_repair.table_object,
flags => rdsadmin.rdsadmin_dbms_repair.noskip_flag);
end;
/
exec rdsadmin.rdsadmin_dbms_repair.drop_repair_table;
exec rdsadmin.rdsadmin_dbms_repair.drop_orphan_keys_table;
#################################################
#################################################
Using rdsadmin utility for daily operations :
After moving to AWS we need to perform all task using rdsadmin utility . Though some task works traditional way its recommended to perform all tsk using rdsadmin
Killing Session :
rdsadmin.rdsadmin_util.kill(
sid => &sid,
serial => &serial,
method => 'IMMEDIATE');
end;
/
Flush database pools :
exec rdsadmin.rdsadmin_util.flush_buffer_cache;
Perform rman operations :
BEGIN
p_validation_type => 'PHYSICAL+LOGICAL',
p_parallel => 4,
p_section_size_mb => 10,
p_rman_to_dbms_output => FALSE);
END;
/
Giving and revoking grants :
rdsadmin.rdsadmin_util.grant_sys_object(
p_obj_name => 'V_$SESSION',
p_grantee => 'PYTHIAN',
p_privilege => 'SELECT');
end;
/
begin
rdsadmin.rdsadmin_util.grant_sys_object(
p_obj_name => 'V_$SESSION',
p_grantee => 'PYTHIAN',
p_privilege => 'SELECT',
p_grant_option => true);
end;
/
begin
p_obj_name => 'V_$SESSION',
p_grantee => 'USER1',
p_privilege => 'SELECT');
end;
/
rdsadmin.rdsadmin_util.grant_sys_object(
p_obj_name => 'V_$SESSION',
p_grantee => 'USER1',
p_privilege => 'SELECT',
p_grant_option => true);
end;
/
rdsadmin.rdsadmin_util.revoke_sys_object(
p_obj_name => 'V_$SESSION',
p_revokee => 'PYTHIAN',
p_privilege => 'SELECT');
end;
/
Create password verification functions :
rdsadmin.rdsadmin_password_verify.create_verify_function(
p_verify_function_name => 'CUSTOM_PASSWORD_FUNCTION',
p_min_length => 12,
p_min_uppercase => 2,
p_min_digits => 1,
p_min_special => 1,
p_disallow_at_sign => true);
end;
/
select TEXT from DBA_SOURCE
where OWNER = 'SYS' and NAME = 'CUSTOM_PASSWORD_FUNCTION' order by LINE;
rdsadmin.rdsadmin_util.set_configuration(
name => 'archivelog retention hours',
value => '24');
end;
/
commit
/
exec rdsadmin.rdsadmin_util.show_configuration
SELECT * FROM rdsadmin.tracefile_listing;
or
SELECT * FROM TABLE(rdsadmin.rds_file_util.listdir('BDUMP'));
Checking database listener log and alert log :
SPOOL listener_log.HTML
set echo on
select ORIGINATING_TIMESTAMP,MESSAGE_TEXT from listenerlog where ORIGINATING_TIMESTAMP >= TO_DATE (‘2018-05-31,12:01:56’, ‘yyyy-mm-dd, hh24:mi:ss’)
AND ORIGINATING_TIMESTAMP < TO_DATE (‘2018-06-01, 12:01:56’, ‘yyyy-mm-dd, hh24:mi:ss’) order by originating_timestamp ;
spool off
set markup html off spool off
set markup html on spool on
set echo on
select ORIGINATING_TIMESTAMP,MESSAGE_TEXT from alertlog where upper(message_text) like ‘%ORA-60%’ and ORIGINATING_TIMESTAMP >= TO_DATE (‘2018-05-31,12:01:56’, ‘yyyy-mm-dd, hh24:mi:ss’)
AND ORIGINATING_TIMESTAMP < TO_DATE (‘2018-06-01, 12:01:56’, ‘yyyy-mm-dd, hh24:mi:ss’) order by originating_timestamp ;
spool off
set markup html off spool off
or
SQL> SELECT text FROM table(rdsadmin.rds_file_util.read_text_file('BDUMP','alert_TECHDATABASKET.log'));
SELECT text FROM table(rdsadmin.rds_file_util.read_text_file('BDUMP','alert_MYDB.log')) where rownum<=10;
Validate database:
BEGIN
p_validation_type => 'PHYSICAL+LOGICAL',
p_parallel => 4,
p_section_size_mb => 10,
p_rman_to_dbms_output => FALSE);
END;
/
/
Adding /
removing supplementary logging
exec rdsadmin.rdsadmin_util.alter_supplemental_logging(p_action => 'ADD');
exec rdsadmin.rdsadmin_util.alter_supplemental_logging(p_action => 'ADD', p_type='ALL');
exec rdsadmin.rdsadmin_util.alter_supplemental_logging(p_action => 'DROP');
/
/
rdsadmin.rdsadmin_util.disconnect(
sid => sid,
serial => serial_number);
end;
Enable /
Disable distributed recovery
/
/
Enable / disable restricted
session
/
/
SET ECHO OFF
SET HEA OFF
SET FEEDBACK OFF
SPOOL /tmp/fixinvalid.sql
select distinct('exec SYS.UTL_RECOMP.RECOMP_SERIAL('''||owner||''');') from dba_objects WHERE status = 'INVALID'
/
SPOOL OFF
SET FEEDBACK ON
SET ECHO ON
@/tmp/fixinvalid.sql
Listing files in database directory
Enable /
Disable force logging
/
/
Switch logfile and perform checkpoint
/
/
Changing default tablespace of
database
/
/
Read an import log under DATA_PUMP_DIR
directory
Taking
hanganalyze and systemstate
EXEC rdsadmin.manage_tracefiles.hanganalyze;
EXEC rdsadmin.manage_tracefiles.dump_systemstate;
#################################################
#################################################
References :
4) https://rdsora.workshop.aws/
5) https://www.youtube.com/watch?v=vpSWZx4-M-M&feature=emb_logo
#################################################
#################################################
Running Production Oracle Databases on Amazon RDS for Oracle - AWS Virtual Workshop :