###########################################################
Rac and Asm :
Flex Clusters
Oracle 12c has introduced Flex Clusters which use hub-and-spoke technology, allowing the cluster to scale much beyond the pre-12c clusters as it requires:
Fewer network interactions between nodes in the cluster, and :
Less contention for key Clusterware resources like OCR and voting disks.
A Flex Cluster has two types of nodes: Hub Nodes and Leaf Nodes.
Hub Nodes
Ø These nodes are essentially same as conventional nodes in Pre-12c clusters and form the core of the cluster.
Ø Each Hub Node is connected with other Hub Nodes via private network for peer-to-peer communication.
Ø Each Hub Node can access the shared storage and hence the OCR and voting disks lying on the shared storage.
Ø A Hub Node may host an ASM instance, database instance(s) and applications.
Ø Each cluster must have at least one Hub Node and can have up to 64 Hub Nodes.
Leaf Nodes
Ø Leaf Nodes are more loosely coupled to the cluster than Hub Nodes and are not connected among themselves.
Ø Each Leaf Node is connected to the cluster through a Hub Node through which it requests the data.
Ø Though Leaf Nodes do not require direct access to shared storage, they may be provided access so that they can be changed to a Hub Node in future.
Ø They run a lightweight version of the Clusterware.
Ø They cannot host database or ASM instances.
Ø Leaf Nodes can host different types of applications e.g. Fusion Middleware, EBS, IDM, etc. The applications on Leaf Nodes can failover to a different node if the Leaf Node fails.
Ø There may be zero or more Leaf Nodes in a flex cluster.
Ø All Leaf Nodes are on the same public and private network as the Hub Nodes.
Prerequisites for FlexCluster:-
Ø You must use Grid Naming Service (GNS) with an Oracle Flex Cluster deployment.
Ø You must configure the GNS VIP as a static IP address for Hub Nodes.
Ø On Multi-cluster configurations, you must identify the GNS client data file location for Leaf Nodes. The GNS client data files are copied over from the GNS server before you start configuring a GNS client cluster.
Ø All public network addresses for both Hub Nodes and Leaf Nodes, whether assigned manually or automatically, must be in the same subnet range.
Ø All Oracle Flex Cluster addresses must be either static IP addresses, DHCP addresses assigned through DHCP (IPv4) or autoconfiguration addresses assigned through an autoconfiguration service (IPv6), registered in the cluster through GNS.
Important Notes:-
Ø Once the cluster is moved to Flexcluster, you cannot revert to standard mode,
Ø The node roles can be modified i.e leaf to hub and vice versa.
Ø FlexASM is required before you enable flexcluster.
Ø The database nodes should not be set as leaf node, the cluster crs will fail to start the service since there is a hard dependency on asm storage for voting disk and ocr, see error below if you do so.
Ø If there is no GNS the flexcluster mode will not be able to start up, the log throws the following error
Generally, an application layer and a database layer can be together and managed by a single cluster. So every node in cluster should have an access to the shared storage i.e Voting disk and OCR and every node should be tightly connected with shared storage. This tightly coupling will lead to the contention in the storage i.e voting disk polling by every node and also can cause cluster interconnect contention i.e network heart beat ping to all nodes need to be done. Another issue is that scalability, since the cluster can be limited to 100 nodes this can be a greater problem for larger enterprise system. Since both Application and Database layers may need to be managed as a single cluster so that entire services can be managed with high availability infrastructure.
Actually the application layer nodes need not to have access to shared storages, indeed the database layer since the data and the criticality lies here. To overcome this,
From 12c onwards, Flexcluster is designed over HUB-LEAF topology to scale the Cluster to large number of nodes, literally 1000s of nodes. Hub nodes are very much similar to the standard cluster architecture, they are tightly coupled through a private interconnect and have direct access to shared storage. On the contrary, Leaf nodes are very light weight servers, not connected to other leaf nodes, and have no direct access to the storage. A Hub node can have multiple leaf nodes, but, a node leaf can’t be part of multiple of Hub nodes. In a nutshell, the prime purpose of an Oracle Flex Cluster is to provide the combined database and application tiers together in a single clustering environment.
From Gridinfrastructure perspective, the hub nodes are database nodes contains full blown GI stack, where the Leaf nodes are typically application (middle layer) contains smaller footprint of GI stack.
Here the leaf nodes (typically services/module) of application connected to the nodes to the db service. so each group of Leaf nodes will connect to one db node,
Ø db node i.e hub node fails the db service failed over to other db nodes, then the leaf nodes attached to that hub node also failed over to another hub node where the service is running
Ø But when a leaf node is failed, the services attached to this leaf node will be failed over to another leaf node.
Traditional Standard Cluster and Flex cluster. In a traditional standard cluster, all nodes in a cluster are tightly integrated to each other and interact through a private network and can access the storage directly. On the other hand, the Flex Cluster introduced two types of nodes arranged in Hub and Leaf nodes architecture. The nodes arranged in Hub nodes category are similar to the traditional standard cluster, i.e. they are interconnected to each other through a private network and have the directly storage read/write access. The Leaf nodes are different from the Hub nodes. They don’t need to have direct access to the underlying storage; rather they access the storage/data through Hub nodes.
You can configure Hub nodes up to 64, and Leaf nodes can be many. In an Oracle Flex Cluster, you can have Hub nodes without having Leaf nodes configured, but no Leaf nodes exist without Hub nodes. You can configure multiple Leaf nodes to a single Hub node. In Oracle Flex Cluster, only Hub nodes will have direct access to the OCR/Voting disks. When you plan large scale Cluster environments, this would be a great feature to use. This sort of setup greatly reduces interconnect traffic, provides room to scale up the cluster to the traditional standard cluster.
There are two ways to deploy the Flex Cluster:
1. While configuring a brand new cluster
2. Upgrade a standard cluster mode to Flex Cluster
If you are configuring a brand new cluster, you need to choose the type of cluster configuration during step 3, select Configure a Flex Cluster option and you will have to categorize the Hub and Leaf nodes on Step 6. Against each node, select the Role, Hub or Leaf, and optionally Virtual Hostname too.
The following steps are required to convert a standard cluster mode to Flex Cluster mode:
1. Get the current status of the cluster using the following command:
$ ./crsctl get cluster mode status
2. Run the following command as the root user:
$ ./crsctl set cluster mode flex
$ ./crsctl stop crs
$ ./crsctl start crs –wait
3. Change the node role as per your design
$ ./crsctl get node role config
$ ./crsctl set node role hub|leaf
$ ./crsctl stop crs
$ ./crsctl start crs -wait
Note the following:
o You can’t revert back from Flex to Standard cluster mode
o Cluster node mode change requires cluster stack stop/start
o Ensure GNS is configured with a fixed VIP
Split Brain: What’s new in Oracle Database 12.1.0.2c
In an Oracle cluster prior to version 12.1.0.2c, when a split brain problem occurs, the node with lowest node number survives. However, starting from Oracle Database 12.1.0.2c, the node with higher weight will survive during split brain resolution.
Flex ASM
Flex ASM in Oracle 12c is an optional deployment feature, where
an individual can choose either a standard ASM or Flex ASM type configuration
during the course Oracle 12c Grid Infrastructure setup. For an Oracle Flex
Cluster setup, Oracle Flex ASM option is selected automatically and three ASM
instance by default will be configured on three of Hub Nodes. If a standard
cluster deployment is selected, then, you will have a choice to choose either a
standard ASM configuration or Flex ASM configuration,
-- The sever where there
is a database instance but no ASM instance is called a clienT
-- Flex ASM Cluster is
perhaps it is the biggest change in ASM since its introduction 10 years ago
-- By default, there are
three Flex ASM instances in a cluster; but that number can be changed.
-- if asm crash on flex cluster -- say node 3 --
existing client will become flex
node-- say node 1 -- and node 3 will still able to access data as
client
-- asm password file was
introduced to solve asm connectivity problem
-- asm inter connect :
$ asmcmd --inst +ASM2
Flex ASM is a new architecture in Oracle Cluster/Grid Infrastructure where you can reduce the foot print of ASM instances in the cluster. I.e you really do not need 4 ASM instances for 4 Nodes.
In addition to above, Flex ASM also alleviate the problem of RDBMS instance dependency on ASM instance. For instance, if an ASM instance is down in a node , all of the rdbms instances in that node will fail and down.
To understand how this works. we just need to get some brief on leaf nodes and hub nodes.
In a clustered environment (Now oracle Flexcluster), Oracle now expands the capability of monitoring and managing the middleware layer through grid infrastructure i.e if you have oracle ebs instances as your middleware those also can be part of your cluster but having less priority those are called leaf nodes. Hub nodes in the contrast are high priority like RDBMS instances or ASM instances etc.
Coming back to the Flex ASM, asm disks can be mounted across this hub nodes for example a group of nodes called as a hub and managed by certain set of asm instances and so on with either a separate ASM private network or with private cluster interconnect. The ASM instances itself now acts as clients to its ASM instances in flex asm mode, as the one of the hub nodes really not running the asm instance rather connected as a client to other hub node and uses that asm instance remotely In order to achieve this, you will need to have special considerations on your RAC Cluster.
With Flex ASM Oracle 12c, a new type of network is called the ASM network. it is used for communication between ASM and its clients and is accessible on all the nodes. All ASM clients in the cluster have access to one or ore ASM network. Also it is possible to configure single network can perform both function as a private and an ASM network
ASM Listeners
To support FLex ASM, a set of ASM listeners are configured for every ASM network. Up to three ASM listener addresses are registred as remote listeners in each client database instance. All clients connections are load balanced across the entire set of ASM instances
ora.ASMNET1LSNR_ASM.lsnr
ONLINE ONLINE Geek DBA12c-rac01 STABLE
ONLINE ONLINE Geek DBA12c-rac02 STABLE
ONLINE ONLINE Geek DBA12c-rac03 STABLE
ADVM Proxy
ASM Dynamic Volume Manager (ADVM) Proxy is a special Orale instance. It enables ADVM to connect to Flex ASM and is required to run on the same node as ADVM and ACFS. It can be shutdown when ACFS is not running
ora.proxy_advm
NAME TARGET STATE SERVER STATE_DETAILS
------------------------- ---------- ---------- ------------ ------------------
Name Target State Server State
ora.proxy_advm ONLINE ONLINE Geek DBA12c-rac01 STABLE
ora.proxy_advm ONLINE ONLINE Geek DBA12c-rac02 STABLE
ora.proxy_advm ONLINE ONLINE Geek DBA12c-rac03 STABLE
# a seperate apx instance will be running
$ ps -elf | grep pmon | grep APX
0 S oragrid 4019 1 0 80 0 - 457594 semtim 08:09 ? 00:00:00 apx_pmon_+APX2
<strong> </strong>
#Checking whether ASM instance is not in FlexASM Mode and the ASM clients
$srvctl config asm
ASM home: /u01/app/oracle/12.1.0.1/grid
Password file: +DATA/ASM/PASSWORD/pwdasm.490.780738119
ASM listener: LISTENER
ASM instance count: ALL
Cluster ASM listener: ASMNET1LSNR_ASM
Notice the ASM Instance count = ALL says that asm instances should run on all instances
#Another check , check the cardinality in the CRS Profile, the crs_hub_size means asm should run
on all instances
$ crsctl status resource ora.asm -f | grep CARDINALITY=
CARDINALITY=%CRS_HUB_SIZE%
# v$asm_client shows the clients connected to asm instances
# as you see the asm instances are local to the database clients
SQL> select INST_ID,GROUP_NUMBER, INSTANCE_NAME, DB_NAME,
INSTANCE_NAME||':'||DB_NAME client_id, STATUS from gv$asm_client;
INST_ID GROUP_NUMBER INSTANCE_N DB_NAME CLIENT_ID STATUS
---------- ------------ ---------- -------- -------------------- ------------
1 1 racdb1 racdb racdb1:racdb CONNECTED -->asm instance 1 to db instance 1
2 1 racdb2 racdb racdb2:racdb CONNECTED -->asm instance 2 to db instance 2
3 1 racdb3 racdb racdb3:racdb CONNECTED -->asm instance 3 to db instance 3
3 0 +APX1 +APX +APX1:+APX CONNECTED --> ADVM proxy instances
3 0 +APX2 +APX +APX2:+APX CONNECTED
3 0 +APX3 +APX +APX3:+APX CONNECTED
3 1 -MGMTDB _mgmtdb -MGMTDB:_mgmtdb CONNECTED --> MGMT repository db
The asm instances are locally connected to each of its own asm instances like below
# asm is running on three nodes
$ srvctl status asm -detail
ASM is running on racdb3,racdb2,racdb1
ASM is enabled.
# modify the asm count
$ srvctl modify asm -count 2
# check the ASM configuration
srvctl config asm
ASM home: /u01/oracle/12.1.0.1/grid
Password file: +DATA/ASM/PASSWORD/pwdasm.490.780738119
ASM listener: LISTENER
ASM instance count: 2
Cluster ASM listener: ASMNET1LSNR_ASM
Notice the ASM Instance count = ALL says that asm instances should run on all instances
Another check , check the cardinality in the CRS Profile
+ASM1 > crsctl status resource ora.asm -f | grep CARDINALITY=
CARDINALITY=2
# check the asm, its now running only on two nodes
$ srvctl status asm -detail
ASM is running on racdb3,racdb2
ASM is enabled.
# check the status of database instances to which db asm instance its serving.
# as you saw the node 3
SQL> select INST_ID,GROUP_NUMBER, INSTANCE_NAME, DB_NAME, INSTANCE_NAME||':'||DB_NAME client_id, STATUS from gv$asm_client
where DB_NAME = 'racdb';
INST_ID GROUP_NUMBER INSTANCE_N DB_NAME CLIENT_ID STATUS
---------- ------------ ---------- -------- -------------------- ------------
3 1 racdb1 racdb racdb1:racdb CONNECTED <-- ASM connection connected via Network
3 1 racdb2 racdb racdb2:racdb CONNECTED
2 1 racdb3 racdb racdb3:racdb CONNECTED
# v$asm_client shows the clients connected to asm instances
# as you see the inst_id 3 serving racdb1 & racdb3 instances now.
# also see now the asm instance 3 is part of asm client, means asm instance 3 itself register
# as part of client
SQL> select INST_ID,GROUP_NUMBER, INSTANCE_NAME, DB_NAME, INSTANCE_NAME||':'||DB_NAME client_id, STATUS from gv$asm_client;
INST_ID GROUP_NUMBER INSTANCE_N DB_NAME CLIENT_ID STATUS
---------- ------------ ---------- -------- -------------------- ------------
3 1 +ASM3 +ASM +ASM3:+ASM CONNECTED --> ASM instance
3 1 racdb1 racdb racdb1:racdb CONNECTED --> INST_ID=3 serving
3 1 racdb2 racdb racdb2:racdb CONNECTED serving t wo databases
2 1 racdb3 racdb racdb3:racdb CONNECTED
3 0 +APX1 +APX +APX1:+APX CONNECTED --> ADVM proxy instances
3 0 +APX2 +APX +APX2:+APX CONNECTED
3 0 +APX3 +APX +APX3:+APX CONNECTED
3 1 -MGMTDB _mgmtdb -MGMTDB:_mgmtdb CONNECTED --> MGMT repository db
#once you set the cardinality to two the asm alert log shows this
Thu Oct 27 09:35:35 2013
NOTE: ASMB registering with ASM instance as client 0x70004 (reg:398621261)
NOTE: ASMB connected to ASM instance +ASM3 (Flex mode; client id 0x70004)
NOTE: ASMB rebuilding ASM server state
NOTE: ASMB rebuilt 1 (of 1) groups
NOTE: ASMB rebuilt 20 (of 20) allocated files
NOTE: fetching new locked extents from server
NOTE: 0 locks established; 0 pending writes sent to server
SUCCESS: ASMB reconnected & completed ASM server state
MGMTDB Instance
Oracle Grid infrastructure 12c comes with GIMR - Grid Infrastructure Management Repository, aka MGMTDB. This is intended to help in troubleshooting
clusterware issues and has become mandatory starting from version 12.1.0.2.The tiny database instance in question runs in single instance mode and
is managed by the clusterware. One of the perks is that it has its own listener (called MGMTLSNR), which listens on the private interconnect network
interface and the default port 1521. Three services are typically registered on this special listener, the main one being the {DBNAME}_cluster service.
This is used by the CHM (Cluster Health Monitor) daemons and clients.
This is a Oracle single instance which is being managed by Grid Infrastructure and fails over to surviving node if existing node crashes.You can identify the current master using below command
-bash-4.1$ oclumon manage -get MASTER
Master = oradbdev02
This DB instance can be managed using srvctl commands. Current master can also be identified using status command
$srvctl status mgmtdb
Database is enabled
Instance -MGMTDB is running on node oradbdev02
We can look at mgmtdb config using
$srvctl config mgmtdb
Database unique name: _mgmtdb
Database name:
Oracle home: /home/oragrid
Oracle user: oracle
Spfile: +VDISK/_mgmtdb/spfile-MGMTDB.ora
Password file:
Domain:
Start options: open
Stop options: immediate
Database role: PRIMARY
Management policy: AUTOMATIC
Database instance: -MGMTDB
Type: Management
Replace config with start/stop to start/stop database.
Databases files for repository database are stored in same location as OCR/Voting disk
SQL> select file_name from dba_data_files union select member file_name from V$logfile;
FILE_NAME
------------------------------------------------------------
+VDISK/_MGMTDB/DATAFILE/sysaux.258.819384615
+VDISK/_MGMTDB/DATAFILE/sysgridhomedata.261.819384761
+VDISK/_MGMTDB/DATAFILE/sysmgmtdata.260.819384687
+VDISK/_MGMTDB/DATAFILE/system.259.819384641
+VDISK/_MGMTDB/DATAFILE/undotbs1.257.819384613
+VDISK/_MGMTDB/ONLINELOG/group_1.263.819384803
+VDISK/_MGMTDB/ONLINELOG/group_2.264.819384805
+VDISK/_MGMTDB/ONLINELOG/group_3.265.819384807
We can verify the same using oclumon command
-bash-4.1$ oclumon manage -get reppath
CHM Repository Path = +VDISK/_MGMTDB/DATAFILE/sysmgmtdata.260.819384687
Since this is stored at same location as Voting disk, if you have opted for configuring Management database, you will need to use voting disk with size >5G (3.2G+ is being used by MGMTDB).
During GI Installation ,I had tried adding voting disk of 2G but it failed saying that it is of insufficient size. Error didnot indicate that its needed for Management repository but now I think this is because of repository sharing same location as OCR/Voting disk.
Default (also Minimum) size for CHM repository is 2048 M . We can increase respository size by issuing following command
-bash-4.1$ oclumon manage -repos changerepossize 4000
The Cluster Health Monitor repository was successfully resized.The new retention is 266160 seconds.
This command internally runs resize command on datafile and we can see that it changed datafile size from 2G to 4G
SQL> select file_name,bytes/1024/1024,maxbytes/1024/1024,autoextensible from dba_data_files;
FILE_NAME BYTES/1024/1024 MAXBYTES/1024/1024 AUT
-------------------------------------------------- --------------- ------------------ ---
+VDISK/_MGMTDB/DATAFILE/sysmgmtdata.260.819384687 4000 0 NO
If we try to reduce the size from 4Gb to 3Gb, it will warn and upon user confirmation drop all repository data
-bash-4.1$ oclumon manage -repos changerepossize 3000
Warning: Entire data in Cluster Health Monitor repository will be deleted.Do you want to continue(Yes/No)?
Yes
The Cluster Health Monitor repository was successfully resized.The new retention is 199620 seconds.
Tracefiles for db are stored under DIAG_HOME/_mgmtdb/-MGMTDB/trace. Alert log for instance can be found at this location.
Since file name start with -MGMTDB*, we need to use ./ to access files. e.g
[oracle@oradbdev02]~/diag/rdbms/_mgmtdb/-MGMTDB/trace% vi ./-MGMTDB_mmon_7670.trc
Troubleshooting
srvctl config mgmtlsnr | egrep ‘Name|Type|points’
srvctl status mgmtlsnr | grep node
lsnrctl status MGMTLSNR | grep ‘DESRIPT|Service.*inst’
srvctl config mgmtdb | egrep ‘service|instance’
# on each node:
crsctl stop res ora.crf -init # the “-init” specifies a local resource# just from one node
srvctl status MGMTDB
srvctl stop MGMTDB
srvctl start MGMTDB
srvctl status MGMTDB# on each node:
crsctl start res ora.crf -init
crsctl status res ora.crf -init
# check that the ologgerd daemon is running (only runs on one node):
oclumon manage -get mylogger
ps -ef|grep ologger # on the logger host only
# check that the sysmond process is running
ps -ef|grep sysmond # on each host
# see if the problem is fixed
oclumon manage -get resize
[oracle@oradbdev02]~% oclumon dumpnodeview -allnodes
----------------------------------------
Node: oradbdev02 Clock: '13-07-23 07.19.00' SerialNo:1707
----------------------------------------
SYSTEM:
#pcpus: 4 #vcpus: 4 cpuht: N chipname: Dual-Core cpu: 5.15 cpuq: 1 physmemfree: 469504 physmemtotal: 7928104 mcache: 5196464 swapfree: 8191992 swaptotal: 8191992 hugepagetotal: 0 hugepagefree: 0 hugepagesize: 2048 ior: 0 iow: 51 ios: 9 swpin: 0 swpout: 0 pgin: 134 pgout: 140 netr: 223.768 netw: 176.523 procs: 461 rtprocs: 25 #fds: 24704 #sysfdlimit: 779448 #disks: 6 #nics: 3 nicErrors: 0
TOP CONSUMERS:
topcpu: 'oraagent.bin(7090) 2.59' topprivmem: 'java(7247) 149464' topshm: 'ora_mman_snowy1(7783) 380608' topfd: 'ocssd.bin(6249) 273' topthread: 'crsd.bin(6969) 42'
----------------------------------------
Node: oradbdev03 Clock: '13-07-23 07.19.02' SerialNo:47
----------------------------------------
SYSTEM:
#pcpus: 4 #vcpus: 4 cpuht: N chipname: Dual-Core cpu: 3.65 cpuq: 2 physmemfree: 1924468 physmemtotal: 7928104 mcache: 4529232 swapfree: 8191992 swaptotal: 8191992 hugepagetotal: 0 hugepagefree: 0 hugepagesize: 2048 ior: 1 iow: 83 ios: 17 swpin: 0 swpout: 0 pgin: 45 pgout: 55 netr: 67.086 netw: 55.042 procs: 373 rtprocs: 22 #fds: 21280 #sysfdlimit: 779448 #disks: 6 #nics: 3 nicErrors: 0
TOP CONSUMERS:
topcpu: 'osysmond.bin(19281) 1.99' topprivmem: 'ocssd.bin(19323) 83528' topshm: 'ora_mman_snowy2(20306) 261508' topfd: 'ocssd.bin(19323) 249' topthread: 'crsd.bin(19617) 40'
----------------------------------------
Node: oradbdev04 Clock: '13-07-23 07.18.58' SerialNo:1520
----------------------------------------
SYSTEM:
#pcpus: 4 #vcpus: 4 cpuht: N chipname: Dual-Core cpu: 3.15 cpuq: 1 physmemfree: 1982828 physmemtotal: 7928104 mcache: 4390440 swapfree: 8191992 swaptotal: 8191992 hugepagetotal: 0 hugepagefree: 0 hugepagesize: 2048 ior: 0 iow: 25 ios: 4 swpin: 0 swpout: 0 pgin: 57 pgout: 27 netr: 81.148 netw: 41.761 procs: 355 rtprocs: 24 #fds: 20064 #sysfdlimit: 779450 #disks: 6 #nics: 3 nicErrors: 0
TOP CONSUMERS:
topcpu: 'ocssd.bin(6745) 2.00' topprivmem: 'ocssd.bin(6745) 83408' topshm: 'ora_mman_snowy3(8168) 381768' topfd: 'ocssd.bin(6745) 247' topthread: 'crsd.bin(7202) 40'
Tuning ASM rebalance operations
The new EXPLAIN WORK FOR statement in 12c measures the amount of work required for a given ASM rebalance operation and inputs the result in V$ASM_ESTIMATE dynamic view. Using the dynamic view, you can adjust the POWER LIMIT clause to improve the rebalancing operation work. For example, if you want to measure the amount of work required for adding a new ASM disk, before actually running the manual rebalance operation, you can use the following:
SQL> EXPLAIN WORK FOR ALTER DISKGROUP DG_DATA ADD DISK data_005;
SQL> SELECT est_work FROM V$ASM_ESTIMATE;
SQL> EXPLAIN WORK SET STATEMENT_ID='ADD_DISK' FOR ALTER DISKGROUP DG_DATA ADD DISK data_005;
SQL> SELECT est_work FROM V$ASM_ESTIMATE WHERE STATEMENT_ID = 'ADD_DISK’;
You can adjust the POWER limit based on the output you get from the dynamic view to improve the rebalancing operations.
ASM 12c New Feature Replace Command
We are going to test the new replace command for a simulated disk failure. In the test we will simulate that disk DG_DISK1A is bad after a bad plate and will be replaced with disk DG_DISK4A. Before 12c this would require to drop the disk from diskgroup and then add the new disk to the diskgroup. This would cause a complete rebalance of the diskgroup consuming time and resources.
Login to ASM as syasm
ALTER DISKGROUP DG_MIRROR REPLACE DISK DG_DISK1A WITH 'ORCL:DG_DISK4A
ALTER DISKGROUP data2 REPLACE DISK diskc7 WITH '/devices/diskc18' POWER 3;
ASM Disk Scrubbing
When you use ASM mirroring (normal or high redundancy), there are more than one copy of an allocation unit (AU). The AU and its copies should be in sync. Sometimes logical corruption creep in, resulting in higher response time from the disk affected by the corruption. In Oracle Database 12c ASM you can use a new command called SCRUB to weed out the logical corruption. This command repairs the logical corruption by reading the data from the mirror copies. Here is how you would repair the diskgroup DATA:
SQL> alter diskgroup data scrub repair;
Diskgroup altered.
Again, as with the previously described operations involving large movements of data between disks, you can control how much resource this operation will take by using a special clause called "power". However, instead of a number, this parameter expects values from the list: LOW, HIGH, MAX and AUTO. A power of MAX will consume most resources to complete the operation faster but may affect other operations in the system. Here is how:
SQL> alter diskgroup data scrub power max;
The power value of AUTO lets ASM choose the best power value depending on the system resources available. This is also the default option. If the load on the system I/O is very high, the scrubbing operation is not performed by Oracle since it will just make the I/O response even worse. To force the scrubbing even under those circumstances, you should use the FORCE clause:
SQL> alter diskgroup data scrub repair power max force;
But scrubbing is not just for the entire diskgroup; you may choose to scrub a single disk as well. This is helpful if you want to break up the activities to one disk at a time. Here is how you do it for a disk:
SQL> alter diskgroup data scrub disk data_0000 repair power max force;
Diskgroup altered.
The good new does not stop there. You can even repair a specific file. This is particularly useful when you want to make sure important files such as system or sysaux datafiles and vital application related files are scrubbed first.
SQL> alter diskgroup data scrub file '+DATA/CONA/DATAFILE/USERS.271.824035767' repair;
Diskgroup altered.
What if you want to merely check the presence of the logical corruptions; not actually fix them? Fair question. Just omit the keyword "repair" in the command.
SQL> alter diskgroup data scrub file '+DATA/CONA/DATAFILE/USERS.271.824035767';
This will report the logical corruptions; not actually fix them.
Diskgroup Type
You can now specify the content of the diskgroup. You can specify three types of content, depending on which Oracle will decide to put the copy of the AU on the available disks. If the content type is data, then the AU copy is placed at the next disk. If the content typ is recovery, then Oracle places the AU not on the next disk; but two disks away. Here is how you specify the content type:
data - for data, which places the AU copies on the neighboring disks
recovery - for FRA, which places the AU two disks from the primary
system - for system related files, which places the copy four disks away from the primary
ASMCMD> setattr -G FRA content.type recovery
ASMCMD> lsattr -G FRA -l -m content.type
What-If command evaluation
Using the new What-if command evaluation (-eval) option with srvctl, one can now determine the impact of running the command. This new addition to the srvctl command, will let you simulate the command without it actually being executed or making any changes to the current system. This is particularly useful in a situation when you want to make a change to an existing system and you’re not sure of the outcome. Therefore, the command will provide the effect of making the change. The –eval option also can be used with crsctl command.
For example, if you want to know what will happen if you stop a particular database, you can use the following example:
$ ./srvctl stop database –d MYDB –eval
$ ./crsctl eval modify resource <resource_name> -attr “value”
Application connectivity in 12c Rac : Zero downtime in node fail over
###########################################################
###########################################################
Dataguard :
Far sync
Far Sync is an Oracle 12c new feature for Oracle Data Guard. This feature is meant to resolve the performance problems induced by network latency when you maintain a standby database geographically distant of the primary database. In this type of situation you sometimes have to make a compromise between performance and data loss. The Far Sync feature offer you both
The principe is fairly simple, the Far Sync instance receive data synchronously from the primary database and then forward it asynchronously to up de 29 remote destinations.
The far sync database is not a standard database, it only contains a specific controlfile, a spfile and standby redologs. This database must be placed near the primary database to guarantee an optimal network latency during synchronous replication. But be careful, don’t place this database on the same geographical place than the primary, because if your primary database experiences a geographical disaster, your Far Sync will be impacted too, and some data could be lost.
SERVER NAME ROLE
SVR-ORA-03 PRIMARY SERVER
SVR-ORA-04 FAR SYNC SERVER
SVR-ORA-05 STANDBY SERVER
Create normal standby on SVR-ORA-05 .
Create FAR SYNC
>>> create the controlfile for the Far Sync instance using the following command
ALTER DATABASE CREATE FAR SYNC INSTANCE CONTROLFILE AS '/u01/app/oracle/control01.ctl';
>>> then create a pfile from the primary spfile that we will use for the Far Sync instance.
>>> need to create a spfile from my pfile, mount the database and create my standby redologs :
>>> Our Far Sync instance is now ready for the configuration through Data Guard Broker.
>>> changed the db_unique_name of all my three databases.
>>> enable the dg_broker on all database
>>> connect to dgmgrl on the primary server and create the configuration
DGMGRL> CREATE CONFIGURATION dgb_db12c AS PRIMARY DATABASE IS DB12C_PRIM CONNECT IDENTIFIER IS DB12CE_PRIMARY;
Configuration "dgb_db12c" created with primary database "db12c_prim"
DGMGRL> ADD DATABASE DB12C_STBY AS CONNECT IDENTIFIER IS DB12CE_STANDBY MAINTAINED AS PHYSICAL;
Database "db12c_stby" added
DGMGRL> ADD FAR_SYNC DB12C_FS AS CONNECT IDENTIFIER IS DB12CE_FS;
far sync instance "db12c_fs" added
DGMGRL>
>>> configuration is enabled but far sync is not active, we need to configure redo and activate Far Sync
DGMGRL> edit database db12c_prim set property redoroutes='(local:db12c_fs sync)';
Property "redoroutes" updated
DGMGRL> edit far_sync db12c_fs set property redoroutes='(db12c_prim:db12c_stby)';
Property "redoroutes" updated
DGMGRL> enable far_sync db12c_fs;
Enabled.
>>>
Now far sync is enabled, we changed the redo configuration to indicate to the primary database that redo should be forwarded to the Far Sync instance using synch mode.
We edited the Far Sync configuration to indicate that redo will be received from the primary database and then forwarded to the standby database.
Far Sync is a very good solution when your standby geographically distant from your primary and you can’t choose the MaxAvailaibility protection mode for performance reasons.
It is also possible with this solution to choose an alternate archive destination for primary database in the event of a failure on Far Sync instance, in this case the primary database will send the data directly to the standby database asynchronously.
Generating AWR report from Active Dataguard 12c
Oracle 12.2 came up with a new feature that we can generate AWR report from Physical Standby database if we have enabled active datagaurd.
For detailed steps we can refer metalink Doc ID 2409808.1
Auto Sync for Password Files in #Oracle 12c Data Guard
A useful enhancement in 12cR2 is that password files are automatically synchronized in a Data Guard environment
Validate/Verify configuration before switchover
Data Guard Broker in #DB12c introduced a new command, VALIDATE DATABASE, which tremendously lightens the process of information gathering to make sure role change operations succeed. It is very helpful in the case of RAC database usage in Data Guard configuration.
DGMGRL> validate database d1
DGMGRL> validate database verbose d1
For a smooth role transition, it is important to have everything in-place and in sync. Pre-Oracle 12c, a set of commands used on PRIMARY and STANDBY to validate the readiness of the systems. However, with Oracle 12c, this is simplified with the ALTER DATABASE SWITCHOVER VERIFY command. The command performs the following set of actions:
Verifies minimum Oracle version, i.e, Oracle 12.1
PRIMRY DB REDO SHIPPING
Verify MRP status on Standby database
Let’s run the command on the primary database to validate if the environments are ready for the role transition.
sqlplus> alter database switchover to IMMSDB verify;
alter database switchover to IMSDB verify
*
ERROR at line 1:
ORA-16475: succeeded with warnings, check alert log for more details
###########################################################
###########################################################
Other General :
Definer's Rights and Invoker's Rights
Definer's rights and invoker's rights are used to control access to the privileges necessary to run a user-created procedure, or program unit.
In a definer's rights procedure, the procedure executes with the privileges of the owner. The privileges are bound to the schema in which they were created. An invoker's rights procedure executes with the privileges of the current user, that is, the user who invokes the procedure.
For example, suppose user bixby creates a procedure that is designed to modify table cust_records and then he grants the EXECUTE privilege on this procedure to user rlayton. If bixby had created the procedure with definer's rights, then the procedure would look for table cust_records in bixby's schema. Had the procedure been created with invoker's rights, then when rlayton runs it, the procedure would look for table cust_records in rlayton's schema.
By default, all procedures are considered definer's rights. You can designate a procedure to be an invoker's rights procedure by using the AUTHID CURRENT_USER clause when you create or modify it, or you can use the AUTHID DEFINER clause to make it a definer's rights procedure.
Using OFFSET and FETCH with the ORDER BY clause
Returning rows from a SQL statement can be an all or nothing affair.
In many cases the number of rows returned is very large and this can cause issues if you only need to part of the result set.
When results are sorted using the ORDER BY clause, then some options come into play to limit the number of rows returned:
1) You can use TOP to return a specified number of rows.
2) You can use OFFSET and FETCH.
OFFSET
The OFFSET argument is used to identify the starting point to return rows from a result. OFFESET is called an argument since it is technically part of the ORDER BY clause. The OFFSET is the number of rows to skip before including them in the result.
The general form for the OFFSET argument is:
SELECT columns
FROM table
ORDER BY columns OFFSET rows-to-skip ROWS
Where the rows-to-skip is an value greater than or equal to zero.
For example, to show the all but the first 10 employees, ordered by HireDate you could write
SELECT NationalIDNumber,
JobTitle,
HireDate
FROM HumanResources.Employee
ORDER BY HireDate
OFFSET 10 ROWS
Here are some things to consider about OFFSET
OFFSET is part of the ORDER BY clause. It cannot be used on its own.
OFFSET values must be zero or greater. A negative number results in an error.
When OFFSET is 0, then no rows are skipped.
If OFFSET is greater than the number of rows in the ordered results, then no rows are returned.
FETCH
The FETCH argument is used to return a set number of rows. FETCH can’t be used by itself, it is used in conjunction with OFFSET.
Continuing with our example, we can show the 11th through 15th employees hired using this statement
SELECT NationalIDNumber,
JobTitle,
HireDate
FROM HumanResources.Employee
ORDER BY HireDate
OFFSET 10 ROWS
FETCH NEXT 5 ROWS ONLY ;
SELECT NationalIDNumber,
JobTitle,
HireDate
FROM HumanResources.Employee
ORDER BY HireDate
OFFSET 0 ROWS
FETCH NEXT 10 ROWS ONLY ;
SELECT NationalIDNumber,
JobTitle,
HireDate
FROM HumanResources.Employee
ORDER BY HireDate DESC
OFFSET 0 ROWS
FETCH NEXT 10 ROWS ONLY ;
Asynchronous (Delayed) Global Index Maintenance for DROP and TRUNCATE Partition in Oracle Database 12c Release 1
Oracle 12c can optimize the performance of some DROP PARTITION and TRUNCATE PARTITION commands by deferring the associated index maintenance, while leaving the global indexes in a valid state.
If we just dropped or truncated a partition, the global indexes would be marked as invalid. Prior to 12c, using the UPDATE INDEXES clause would cause them to be rebuilt as part of the operation, making the whole operation slower. In the following example we truncate a partition and check the status of the indexes.
ALTER TABLE t1 TRUNCATE PARTITION part_2014 DROP STORAGE UPDATE INDEXES;
ALTER TABLE t1 DROP PARTITION part_2014 UPDATE INDEXES;
See that extra filter? The index is usable, but keys referring to the dropped partition are filtered out. Remove the keys later:
select status,orphaned_entries from user_indexes where index_name='I1';
STATUS ORP
-------- ---
VALID YES
orclz> select enabled,run_count from dba_scheduler_jobs where job_name='PMO_DEFERRED_GIDX_MAINT_JOB';
ENABL RUN_COUNT
----- ----------
TRUE 31
orclz> exec dbms_scheduler.run_job('SYS.PMO_DEFERRED_GIDX_MAINT_JOB')
PL/SQL procedure successfully completed.
Commit complete.
orclz> select status,orphaned_entries from user_indexes where index_name='I1';
STATUS ORP
-------- ---
VALID NO
The column DBA_INDEXES.ORPHANED_ENTRIES shows that Oracle is aware that the index may have keys referring to dropped partitions. There is a pre-seeded daily job that tidies them up; by default, it runs every night from 22:00. In the example above, I'm running it manually. Alternatively, you can execute the DBMS_PART.CLEANUP_GIDX procedure. And then the extra filter isn't needed any more.
12c temporal validity
Valid time temporal support is typically used with Oracle Flashback technology, to perform AS OF and VERSIONS BETWEEN queries that specify the valid time period. You can also use the DBMS_FLASHBACK_ARCHIVE.enable_at_valid_time procedure to specify a option for the visibility of table data: all table data (the default), valid data as of a specified time, or currently valid data within the valid time period at the session level.
The columns like Start_Date and End_Date define the validity of an employee record at any given point in time. This is different from the transaction time which is system maintained and records when that specific record was inserted and/or updated.
In 11g and versions before that, there was no way of tracking the Valid time. The columns were required to be added and maintained by the application developers. Starting from 12c however, this functionality is provided under Temporal Validity. You just provide the Period clause with the column name in table definition and Oracle adds some hidden columns to maintain the Validity. These columns can be accessed and manipulated by users
PERIOD FOR clause
Temporal validity allows you to use the PERIOD FOR clause to define valid time periods on a table using start and end DATE or TIMESTAMP columns. These valid time periods can be used in queries against the table. In the previous example, the STUDENT_MODULES table could have a valid time period defined on the START_DATE and END_DATE columns. This is done during table creation in the following way.
CREATE TABLE student_modules (
id NUMBER(10) NOT NULL,
student_id NUMBER(10) NOT NULL,
module_id NUMBER(10) NOT NULL,
start_date DATE,
end_date DATE,
CONSTRAINT student_modules_pk PRIMARY KEY (id),
CONSTRAINT stmo_stud_fk FOREIGN KEY (student_id) REFERENCES students(id),
CONSTRAINT stmo_modu_fk FOREIGN KEY (module_id) REFERENCES modules(id),
PERIOD FOR student_module_period (start_date, end_date)
);
Periods can be defined against existing tables using the ALTER TABLE command.
-- Create a period using existing columns.
ALTER TABLE student_modules ADD PERIOD FOR student_module_period (start_date, end_date);
-- Remove a period.
ALTER TABLE student_modules DROP (PERIOD FOR student_module_period);
-- Create a period with system generated hidden columns.
ALTER TABLE student_modules ADD PERIOD FOR student_module_period;
Some of the later examples assume the following period has been defined.
ALTER TABLE student_modules ADD PERIOD FOR student_module_period (start_date, end_date);
AS OF PERIOD FOR Queries
With a period defined on the STUDENT_MODULES table, we display students that were on active modules on a specific date using the following query.
SELECT sm.start_date,
sm.end_date,
s.first_name,
s.last_name,
m.name AS module_name
FROM student_modules AS OF
PERIOD FOR student_module_period TO_DATE('12-FEB-2013','DD-MON-YYYY') sm
JOIN students s ON sm.student_id = s.id
JOIN modules m ON sm.module_id = m.id
ORDER BY 1, 2, 3;
VERSIONS PERIOD FOR ... BETWEEN Queries
We can easily take this a step further and find students that were on active modules during a specified time period. This is done using the VERSIONS PERIOD FOR ... BETWEEN syntax.
SELECT sm.start_date,
sm.end_date,
s.first_name,
s.last_name,
m.name AS module_name
FROM student_modules VERSIONS PERIOD FOR student_module_period BETWEEN
TO_DATE('12-FEB-2013','DD-MON-YYYY') AND TO_DATE('06-JAN-2014','DD-MON-YYYY') sm
JOIN students s ON sm.student_id = s.id
JOIN modules m ON sm.module_id = m.id
ORDER BY 1, 2, 3;
DBMS_FLASHBACK_ARCHIVE.enable_at_valid_time
To set the visibility of data in tables with temporal support, you use the DBMS_FLASHBACK_ARCHIVE.enable_at_valid_time procedure.
Only make visible the currently valid records in HR.emp_temp.
exec dbms_flashback_archive.enable_at_valid_time('CURRENT');
Query HR.emp_temp. Which records are currently valid and will be displayed?
select first_name,
to_char(valid_time_start,'dd-mon-yyyy') "Start",
to_char(valid_time_end,'dd-mon-yyyy') "End"
from hr.emp_temp
order by 2;
Make all records in HR.emp_temp visible, regardless of their temporal validity status.
exec dbms_flashback_archive.enable_at_valid_time('ALL');
Query HR.emp_temp. All records should be displayed.
select first_name,
to_char(valid_time_start,'dd-mon-yyyy') "Start",
to_char(valid_time_end,'dd-mon-yyyy') "End"
from hr.emp_temp
order by 2;
Temporal Validity Columns
If the periode clause doesn't set two columns explicitly two hidden columns are added to the table:
PERIOD_NAME_START
and PERIOD_NAME_END
This columns are not visible in the output of:
a SELECT statement (unless the columns are explicitly stated)
the SQL*Plus DESCRIBE statement,
Name Null? Type
----------------------- -------- ----------------
EMPNO NUMBER
LAST_NAME VARCHAR2(30)
START_TIME TIMESTAMP(6)
END_TIME TIMESTAMP(6)
You can see them with the *_TAB_COLS tables (USER_TAB_COLS,DBA_TAB_COLS, ALL_TAB_COLS).
SELECT
SUBSTR( COLUMN_NAME, 1, 22 ) NAME,
SUBSTR( DATA_TYPE, 1, 28 ) DATA_TYPE,
HIDDEN_COLUMN
FROM
USER_TAB_COLS
WHERE
TABLE_NAME = 'MY_EMP';
NAME DATA_TYPE HID
--------------- --------------- ---
END_TIME TIMESTAMP(6) NO
START_TIME TIMESTAMP(6) NO
LAST_NAME VARCHAR2 NO
EMPNO NUMBER NO
USER_VALID_TIME NUMBER YES
In database archiving :
The new 12c Information Life Cycle Management (ILM) feature called In-Database Archiving enables us to overcome the issues stated above by enabling the database to distinguish from active data and ‘older’ in-active data while at the same time storing everything in the same database.
When we enable row archival for a table, a hidden column called ORA_ARCHIVE_STATE column is added to the table and this column is automatically assigned a value of 0 to denote current data and we can decide what data in the table is to be considered as candidates for row archiving and they are assigned the value 1
Enable In database archiving :
SQL> alter table sales row archival;
Table altered.
SQL> select distinct ora_archive_state from sales;
ORA_ARCHIVE_STATE
--------------------------------------------------------------------------------
0
Note – the column ORA_ARCHIVE_STATE is now added to the table SALES and is a hidden column.
We now want to designate all rows in the sales table which belong to the years 1998 and 1999 as old and historical data.
All data after 01-JAN-2000 should be treated as current and active data.
SQL> update sales
2 set ORA_ARCHIVE_STATE=DBMS_ILM.ARCHIVESTATENAME(1)
3 where time_id < '01-JAN-00';
426779 rows updated.
You can actually set ORA_ARCHIVE_STATE column to any string value other than '0' to archive the data, but the DBMS_ILM package uses the following constants.
ARCHIVE_STATE_ACTIVE='0'
ARCHIVE_STATE_ARCHIVED='1'
Now let as assume there is a requirement to view the historical and inactive data as well. At the session level we can set the value for the parameter ROW ARCHIVAL VISIBILITY to ALL . By default it only reflects active rows
SQL> alter session set row archival visibility=ALL;
Password Version :
After migrating to 12c you might face issue logging using user imported from previous version having password version as 10g .
As solution
1) Expire and Reset password ( We can set same binary password as of previous version )
2) Set below in sqlnet.ora
SQLNET.ALLOWED_LOGON_VERSION_SERVER=11
Refer to below oracle document for more information
https://docs.oracle.com/en/database/oracle/oracle-database/18/spmsu/finding-and-resetting-user-passwords-10g-password-version.html#GUID-D7B09DFE-F55D-449A-8F8A-174D89936304
Just to add Oracle has changed hash algorithm of storing password. It can now be vied under spare4 column
select name, spare4 from sys.user$
Create password file in 12.2 Oracle on Asm
Starting with Oracle Database 12c, we can now store a password file directly in to ASM Diskgroup. Also Oracle has made it default for a password to be case sensitive in the password file.
The compatible.asm disk group attribute must be set to 12.1 or higher for the disk group where the password is to be placed.
While creating password file in ASM diskgroup, we always need to mention the dbuniquename parameter of ORAPWD utility. It is the database unique name by means of which Oracle maps a password file to a specific database.
orapwd file='+DATA' entries=10 dbuniquename=orcldb password=sysorcldb
Or
$ asmcmd
ASMCMD> pwcreate --dbuniquename [dbuniquename] [file_path] [sys-password]
If creating passwordfile , we might have to create directory first in asm or it will throw error ORA-17503
ASMCMD [+] > cd +MYDBP_DATA01
ASMCMD [+MYDBP_DATA01] > ls
MYDBP/
ASMCMD [+MYDBP_DATA01] > mkdir MYDBA
ASMCMD [+MYDBP_DATA01] > cd MYDBA
ASMCMD [+MYDBP_DATA01/MYDBA] > ls
ASMCMD [+MYDBP_DATA01/MYDBA] > mkdir PASSWORD
ASMCMD [+MYDBP_DATA01/MYDBA] >
Password file is in ASM Diskgroup; it is secured against unintentional and unauthorized access and file corruption.
For a Cluster (RAC) database, wwe can have a centralized copy of the password file for all the RAC instances without the need of maintaining individual password file for each RAC instance.
The dbuniquename parameter facilitates in creating a single centralized password file for all the RAC instances.
Verify password file location
# crsctl stat res ora.[database].db -f | grep PWFILE
Orapwd enforces password complexity rules in 12.2.0.1
Starting with Oracle Database 12.2.0.1 the orapwd utility – used to create Password Files for remote authentication – enforces complexity rules for the provided password.
When you try to create a password file with a less secure password, the orapwd terminates with an OPW-00029 error.
orapwd file=$ORACLE_HOME/dbs/orapwDB01 password=oracle force=y
OPW-00029: Password complexity failed for SYS user : Password must contain at least 8 characters.
The provided password must succeed the validation of the following password characteristics (extracted from the orapwd utility code).
Password must contain at least 8 characters
Password must not contain double quotes
Password must contain at least 1 letter
Password must contain at least 1 digit
Password must contain at least 1 special character
Password must not contain the username
Password must not contain username reversed
Use strong password
To get rid of the above error, provide a password which fulfills all complexity requirements.
$ orapwd file=$ORACLE_HOME/dbs/orapwDB01 password=welcome1! force=y
Create Password File in 12c format
If you cannot set a strong password, you can use the old 12c Release 1 format using the format parameter – the default for this parameter is 12.2.
$ orapwd file=$ORACLE_HOME/dbs/orapwDB01 password=oracle format=12 force=y
The syntax of the ORAPWD command is as follows:
orapwd FILE=filename [ENTRIES=numusers] [FORCE={y|n}] [ASM={y|n}] [DBUNIQUENAME=dbname] [FORMAT={12|legacy}] [SYSBACKUP={y|n}] [SYSDG={y|n}] [SYSKM={y|n}] [DELETE={y|n}] [INPUT_FILE=input-fname]
force - whether to overwrite existing file (optional),
Using the older 12c format has the disadvantage, that the following features are not supported.
Granting administrative privileges to external users
Enable SSL and Kerberos authentication for administrative users
But you have the possibilty to migrate a Password File to a newer format. During this migration the password complexity rules are ignored. You have to use different names for the involved Password Files.
# Create dummy Password File with old format
$ orapwd file=$ORACLE_HOME/dbs/orapwDB01.tmp password=oracle format=12
# Migrate (copy) Password File to 12.2 format
$ orapwd file=$ORACLE_HOME/dbs/orapwDB01 input_file=$ORACLE_HOME/dbs/orapwDB01.tmp
# Remove dummy Password File
$ rm $ORACLE_HOME/dbs/orapwDB01.tmp
Use the V$PWFILE_USERS view to see the users who have been granted SYSDBA, SYSOPER, SYSASM, SYSKM, SYSDG or SYSBACKUP system privileges for a database.
SQL> select * from v$pwfile_users;
USERNAME SYSDBA SYSOPER SYSASM
-------- ------ ------- ------
SYS TRUE TRUE FALSE
The columns displayed by the view V$PWFILE_USERS are:
| Column | Description |
|---|
USERNAME
| This column contains the name of the user that is recognized by the password file.
|
| SYSDBA | If the value of this column is TRUE, then the user can log on with SYSDBA system privilege.
|
| SYSOPER | If the value of this column is TRUE, then the user can log on with SYSOPER system privilege.
|
| SYSASM | If the value of this column is TRUE, then the user can log on with SYSASM system privilege. |
If orapwd has not yet been executed or password file is not available attempting to grant SYSDBA, SYSOPER, SYSASM, SYSKM, SYSDG or SYSBACKUP privileges will result in the following error:
SQL> grant sysdba to satya;
ORA-01994: GRANT failed: cannot add users to public password file
If your server is using an EXCLUSIVE password file, use the GRANT statement to grant the SYSDBA, SYSOPER, SYSASM, SYSKM, SYSDG or SYSBACKUP system privilege to a user, as shown in the following example:
SQL> grant sysdba to satya;
SQL> select * from v$pwfile_users;
USERNAME SYSDBA SYSOPER SYSASM SYSBACKUP SYSKM SYSDG
-------- ------ ------- ------ ------ ------- ------
SYS TRUE TRUE FALSE FALSE FALSE FALSE
SATYA TRUE FALSE FALSE FALSE FALSE FALSE
SQL> grant sysoper to satya;
SQL> select * from v$pwfile_users;
USERNAME SYSDBA SYSOPER SYSASM SYSBACKUP SYSKM SYSDG
-------- ------ ------- ------ ------ ------- ------
SYS TRUE TRUE FALSE FALSE FALSE FALSE
SATYA TRUE TRUE FALSE FALSE FALSE FALSE
SQL> grant sysasm to satya;
SQL> select * from v$pwfile_users;
USERNAME SYSDBA SYSOPER SYSASM SYSBACKUP SYSKM SYSDG
-------- ------ ------- ------ ------ ------- ------
SYS TRUE TRUE FALSE FALSE FALSE FALSE
SATYA TRUE TRUE TRUE FALSE FALSE FALSE
When you grant SYSDBA, SYSOPER, SYSASM, SYSKM, SYSDG and SYSBACKUP privileges to a user, that user's name and privilege information are added to the password file. If the server does not have an EXCLUSIVE password file (i.e. if the initialization parameter REMOTE_LOGIN_PASSWORDFILE is NONE or SHARED, or the password file is missing), Oracle issues an error if you attempt to grant these privileges.
Use the REVOKE statement to revoke the SYSDBA, SYSOPER, SYSASM, SYSKM, SYSDG and SYSBACKUP system privilege from a user, as shown in the following example:
SQL> revoke sysoper from satya;
SQL> select * from v$pwfile_users;
USERNAME SYSDBA SYSOPER SYSASM SYSASM SYSBACKUP SYSKM SYSDG
-------- ------ ------- ------ ------ ------- ------
SYS TRUE TRUE FALSE FALSE FALSE FALSE
SATYA TRUE FALSE TRUE FALSE FALSE FALSE
A user's name remains in the password file only as long as that user has at least one of these three privileges. If you revoke all 3 privileges, Oracle removes the user from the password file.
Conclusion
A strong password for remote authentication using SYSDBA, SYSBACKUP etc. privilege is a good starting point to archieve a higher level of security accessing the database from the outside. The decision of Oracle to enforce a strong(er) password during creation time of the Password File is a little but good enhancement of the orapwd utility.
To verify the format of your Password File, just use the describe command of the orapwd utility.
$ orapwd describe file=$ORACLE_HOME/dbs/orapwDB01
Password file Description : format=12.2
Move Table and Table partition Online
-- Basic move.
ALTER TABLE t1 MOVE ONLINE TABLESPACE users;
-- Change table compression.
ALTER TABLE t1 MOVE ONLINE TABLESPACE users COMPRESS UPDATE INDEXES;
ALTER TABLE t1 MOVE ONLINE TABLESPACE users NOCOMPRESS UPDATE INDEXES;
-- Change storage parameters.
ALTER TABLE t1 MOVE ONLINE STORAGE (PCTINCREASE 0);
There are some restrictions associated with online moves of tables described here.
It can't be combined with any other clause.
It can't be used on a partitioned index-organized table or index-organized tables that have a column defined as a LOB, VARRAY, Oracle-supplied type, or user-defined object type.
It can't be used if there is a domain index on the table.
Parallel DML and direct path inserts are not supported against an object with an ongoing online move.
Migration of a table partition or sub-partition to a different tablespace no longer requires a complex procedure in Oracle 12c R1. In a similar way to how a heap (non-partition) table online migration was achieved in the previous releases, a table partition or sub-partition can be moved to a different tablespace online or offline. When an ONLINE clause is specified, all DML operations can be performed without any interruption on the partition|sub-partition which is involved in the procedure. In contrast, no DML operations are allowed if the partition|sub-partition is moved offline.
SQL> ALTER TABLE table_name MOVE PARTITION|SUBPARTITION partition_name TO tablespace tablespace_name;
SQL> ALTER TABLE table_name MOVE PARTITION|SUBPARTITION partition_name TO tablespace tablespace_name UPDATE INDEXES ONLINE;
ALTER TABLE emp MOVE SUB|PARTITION emp_part2 TABLESPACE data_ts UPDATE INDEXES ONLINE
The session now simply hangs until the transaction in session one completes, in a similar manner to that of an index rebuild online operation.
The first example is used to move a table partition|sub-partition to a new tablespace offline. The second example moves a table partition/sub-partitioning online maintaining any local/global indexes on the table. Additionally, no DML operation will get interrupted when ONLINE clause is mentioned.
Important notes:
o The UPDATE INDEXES clause will avoid any local/global indexes going unusable on the table.
o Table online migration restriction applies here too.
o There will be locking mechanism involved to complete the procedure, also it might leads to performance degradation and can generate huge redo, depending upon the size of the partition, sub-partition.
Partial Indexes for Partitioned Tables
The decision about which partitions are indexed is made using the INDEXING [ON | OFF] clause associated with each partition, with the default being INDEXING ON.
This feature is one of the best gifts with 12c for sites using the Partitioning Option. Partial Index gives us the ability to create both local and global indexes on only a subset of partitions within a partitioned table. Prior to Oracle 12c , you could not create indexes on selective partitions; Indexes always meant on all of the data. However with Oracle 12c, you can create partial indexes that contains index data from selective partitions only. Thus CBO would now be aware of the indexing characteristics of individual partitions and can access partitions in based on the query requirement.
Table: INDEXING [ON | OFF] Clause
CREATE TABLE t1
(id NUMBER,
description VARCHAR2(50),
created_date DATE)
PARTITION BY RANGE (created_date)
(PARTITION part_2014 VALUES LESS THAN (TO_DATE('01/01/2015', 'DD/MM/YYYY')),
PARTITION part_2015 VALUES LESS THAN (TO_DATE('01/01/2016', 'DD/MM/YYYY')) INDEXING ON,
PARTITION part_2016 VALUES LESS THAN (TO_DATE('01/01/2017', 'DD/MM/YYYY')) INDEXING OFF);
ALTER TABLE t1 MODIFY PARTITION part_2014 INDEXING OFF;
SELECT table_name,
partition_name,
indexing
FROM dba_tab_partitions
ORDER BY 1,2;
Index: INDEXING [FULL | PARTIAL] Clause
Adding the INDEXING PARTIAL clause allows the index to be created as a partial index. The non-indexed partitions are flagged as unusable.
-- Create a partial local index.
DROP INDEX t1_local_partial_idx;
CREATE INDEX t1_local_partial_idx ON t1(created_date) LOCAL INDEXING PARTIAL;
SELECT index_name,
partition_name,
status
FROM user_ind_partitions
ORDER BY 1,2;
Temporary undo
Each Oracle database contains a set of system related tablespaces, such as, SYSTEM, SYSAUX, UNDO & TEMP, and each are used for different purposes within the Oracle database. Pre Oracle 12c R1, undo records generated by the temporary tables used to be stored in undo tablespace, much similar to a general/persistent table undo records. However, with the temporary undo feature in 12c R1, the temporary undo records can now be stored in a temporary table instead of stored in undo tablespace. The prime benefits of temporary undo includes: reduction in undo tablespace and less redo data generation as the information won’t be logged in redo logs. You have the flexibility to enable the temporary undo option either at session level or database level.
Enabling temporary undo
To be able to use the new feature, the following needs to be set:
o Compatibility parameter must be set to 12.0.0 or higher
o Enable TEMP_UNDO_ENABLED initialization parameter
o Since the temporary undo records now stored in a temp tablespace, you need to create the
temporary tablespace with sufficient space
o For session level, you can use: ALTER SESSION SET TEMP_UNDO_ENABLE=TRUE;
Query temporary undo information
The dictionary views listed below are used to view/query the information/statistics about the temporary undo data:
o V$TEMPUNDOSTAT
o DBA_HIST_UNDOSTAT
o V$UNDOSTAT
To disable the feature, you simply need to set the following:
SQL> ALTER SYSTEM|SESSION SET TEMP_UNDO_ENABLED=FALSE;
Restricting PGA size
Pre Oracle 12c R1, there was no option to limit and control the PGA size. Although, you set a certain size to PGA_AGGREGATE_TARGET initialization parameter, Oracle could increase/reduce the size of the PGA dynamically based on the workload and requirements. In 12c, you can set a hard limit on PGA by enabling the automatic PGA management, which requires PGA_AGGREGATE_LIMIT parameter settings. Therefore, you can now set the hard limit on PGA by setting the new parameter to avoid excessive PGA usage.
SQL> ALTER SYSTEM SET PGA_AGGREGATE_LIMIT=2G;
SQL> ALTER SYSTEM SET PGA_AGGREGATE_LIMIT=0; --disables the hard limit
Important notes:
When the current PGA limits exceeds, Oracle will automatically terminates/abort the session/process that holds the most untenable PGA memory.
Oracle Database 12c New Feature: Last Login Time
Oracle has started to record the last login time. It is a small but very useful 12c security feature and operates independently of the database audit
SQL> ALTER SESSION SET NLS_TIMESTAMP_TZ_FORMAT='DD.MM.YYYY HH24:MI:SS';
SQL> SELECT username,last_login FROM dba_users WHERE username='SCOTT';
SQL> col name FOR a15
SQL> ALTER SESSION SET NLS_DATE_FORMAT='DD.MM.YYYY HH24:MI:SS';
SQL> SELECT name,spare6 FROM USER$ WHERE name='SCOTT';
Privilege Analysis
Privilege Analysis is a new feature of Oracle 12c . This feature comes with Oracle DB Vault. Simple you have to buy Oracle DB Vault license to use Privilege Analysis. But, you do not need to enable Oracle DB Vault to use Privilege Analysis, Because It comes with Oracle 12c Enterprise edition.
Privilege Analysis is used for identifying unused privileges and roles in the database. Discovering the set of unused roles and privileges is important to make the database more secure. By using Privilege Analysis, we can define the least number of privileges for users and roles.
The procedure for Privilege Analysis is simple;
The First Step;
You have to create a privilege analysis with DBMS_PRIVILEGE_CAPTURE package .
In order to use privilege analysis; CAPTURE_ADMIN must be granted to the user.
There are four types of privilege analyses which are defined by type parameter in the DBMS_PRIVILEGE_CAPTURE package.
type => DBMS_PRIVILEGE_CAPTURE.g_database is used for creating a privilege analysis for the whole database
type => DBMS_PRIVILEGE_CAPTURE.g_role is used for creating a privilege analysis for a list of roles.
type => DBMS_PRIVILEGE_CAPTURE.g_context is defined by a logical expression with the SYS_CONTEXT function.
Type=> DBMS_PRIVILEGE_CAPTURE.g_role_and_context; is defined by a list of rules and logical expression.
For Example; to create a privilege analysis for the whole database we use below command
BEGIN
DBMS_PRIVILEGE_CAPTURE.create_capture(
name => 'Full Database',
type => DBMS_PRIVILEGE_CAPTURE.g_database
);
/
PL/SQL procedure successfully completed.
In order to create a privilege analysis for a set of defined roles, we use the below command.
BEGIN
DBMS_PRIVILEGE_CAPTURE.create_capture(
name => 'Listed Roles',
type => DBMS_PRIVILEGE_CAPTURE.g_role,
roles => role_name_list('RoleName1', 'RoleName2') );
END;
/
PL/SQL procedure successfully completed.
In order to create a privilege analysis for USER01 user , we use the below command.
BEGIN
DBMS_PRIVILEGE_CAPTURE.create_capture(
name => 'Conditional',
type => DBMS_PRIVILEGE_CAPTURE.g_context,
condition => 'SYS_CONTEXT(''USERENV'', ''SESSION_USER'')=''USER01'''
);
END;
/
In order to create a privilege analysis for USER01 when it uses DBA role we use the below command. By this way ; we can find for what reason USER01 uses DBA role. For example ; USER01 uses DBA role to only create tables. In that case; we can only give create table privilege to USER01 instead of DBA role.
BEGIN
DBMS_PRIVILEGE_CAPTURE.create_capture(
name => 'Role and Condition',
type => DBMS_PRIVILEGE_CAPTURE.g_role_and_context,
roles => role_name_list('DBA'),
condition => 'SYS_CONTEXT(''USERENV'', ''SESSION_USER'')=''USER01'''
); END;
/
PL/SQL procedure successfully completed.
We use the below command to list the list of created privilege analyses.
COLUMN name FORMAT A15
COLUMN roles FORMAT A20
COLUMN context FORMAT A30
SQL> select name,type,roles,context FROM dba_priv_captures;
The Second Step;
We start the privilege analysis with the below command.
BEGIN
DBMS_PRIVILEGE_CAPTURE.enable_capture('Privilege Analysis Name');
END;
/
PL/SQL procedure successfully completed.
The Third Step;
After waiting for a while; I can be one week or one moth. We have stop the privilege analysis with the below command. During that time Oracle keeps records for the privilege analysis.
BEGIN
DBMS_PRIVILEGE_CAPTURE.disable_capture('Privilege Analysis Name');
END;
/
PL/SQL procedure successfully completed.
The Fourth Step;
We should generate result for the capture with the below command;
BEGIN
DBMS_PRIVILEGE_CAPTURE.generate_result('Privilege Analysis Name');
END;
/
PL/SQL procedure successfully completed.
The Fifth Step;
Now we use the below views to work on our captured data.
DBA_PRIV_CAPTURES
DBA_USED_PRIVS
DBA_UNUSED_PRIVS
DBA_USED_OBJPRIVS
DBA_UNUSED_OBJPRIVS
DBA_USED_OBJPRIVS_PATH
DBA_UNUSED_OBJPRIVS_PATH
DBA_USED_SYSPRIVS
DBA_UNUSED_SYSPRIVS
DBA_USED_SYSPRIVS_PATH
DBA_UNUSED_SYSPRIVS_PATH
DBA_USED_PUBPRIVS
DBA_USED_USERPRIVS
DBA_UNUSED_USERPRIVS
DBA_USED_USERPRIVS_PATH
DBA_UNUSED_USERPRIVS_PATH
Oracle Sharding
Sharding is a data tier architecture in which data is horizontally partitioned across independent databases. Each database in such a configuration is called a shard. All of the shards together make up a single logical database, which is referred to as a sharded database (SDB). Oracle Sharding is implemented based on the Oracle Database partitioning feature.
Oracle Sharding is a scalability and availability feature for suitable OLTP applications in which data is horizontally partitioned across discrete Oracle databases, called shards, which share no hardware or software. An application sees the collection of shards as a single logical Oracle database. Sharding provides linear scalability with fault isolation, automation of many lifecycle management tasks, excellent runtime performance, and the many advantages that come using an Oracle database as a shard (such as SQL and JSON support) .
Data Redaction -- Masking
Data Redaction provides selective, on-the-fly redaction of sensitive data in SQL query results prior to display by applications so that unauthorized users cannot view the sensitive data. It enables consistent redaction of database columns across application modules accessing the same database information. Data Redaction minimizes changes to applications because it does not alter actual data in internal database buffers, caches, or storage, and it preserves the original data type and formatting when transformed data is returned to the application.
You can alter the default displayed values for full Data Redaction polices. By default, 0 is the
redacted value when Oracle Database performs full redaction (DBMS_REDACT.FULL) on a
column of the NUMBER data type. If you want to change it to another value , then
you can run the DBMS_REDACT.UPDATE_FULL_REDACTION_VALUES procedure to modify
this value. The modification applies to all of the Data Redaction policies in the current database
instance. After you modify a value, you must restart the database for it to take effect.
Both users SYS and SYSTEM automatically have the EXEMPT REDACTION POLICY system privilege. (SYSTEM has the EXP_FULL_DATABASE role, which includes the EXEMPT REDACTION POLICY system privilege.) This means that the SYS and SYSTEM users can always bypass any existing Oracle Data Redaction policies, and will always be able to view data from tables (or views) that have Data Redaction policies defined on them
The DBMS_REDACT package provides an interface to Oracle Data Redaction, which enables
you to mask (redact) data that is returned from queries issued by low-privileged users or an
application.
* UPDATE_FULL_REDACTION_VALUES Procedure
This procedure modifies the default displayed values for a Data Redaction policy for full redaction.
* After you create the Data Redaction policy, it is automatically enabled and ready to redact data.
* Oracle Data Redaction enables you to mask (redact) data that is returned from queries issued by
low-privileged users or applications. You can redact column data by using one of the following
Methods:
- Full redaction – All content of the column is protected and the type of value returned depends on the data type of the column. For numeric columns, the value zero will be returned. For columns of type character, a space will be returned. This setting can be changed at the database level.
- Partial redaction – Only part of the information is changed. For example, the first digits of the credit card number are replaced by asterisks.
- Regular expressions - You can use regular expressions to search for patterns of data that must be protected.
- Random redaction – Returned values are random; each time a query is executed, the displayed data will be different.
- No redaction - Allows testing the inner workings of redaction policies, with no effect on the results of current running queries. This is widely used during testing phase of redaction policies that will eventually find their way to production environments.
The package includes five procedures to manage the rules and an additional procedure to change the default value for full redaction policy.
- DBMS_REDACT.ALTER_POLICY – allows changes to existing policies.
- DBMS_REDACT.DISABLE_POLICY – disables an existing policy.
- DBMS_REDACT.DROP_POLICY – drop an existing policy.
- DBMS_REDACT.ENABLE_POLICY – enables an existing policy.
- DBMS_REDACT.UPDATE_FULL_REDACTION_VALUES – change the default return value for full redaction. You must restart the database to take effect.
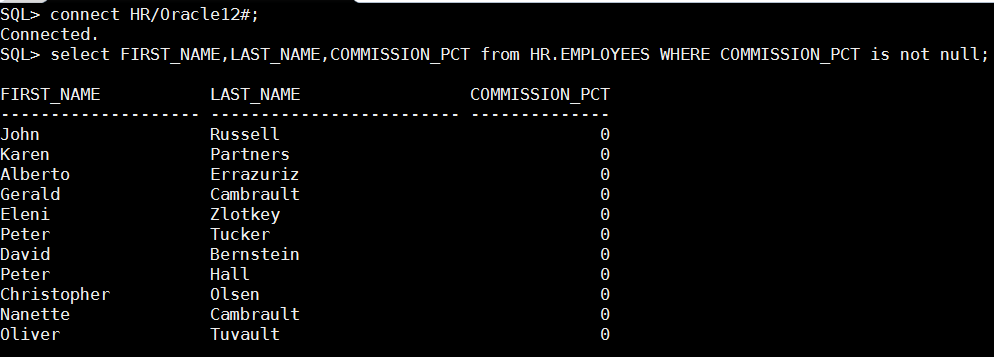
Let’s understand how it works, first we need to create a redaction policy. In the first example I have created a policy on EMPLOYEE table of HR schema, I have used DBMS_REDACT.FULL to completely replace the original data in commission_pct field with nulls or 0. All create policy statements has been issued by SYS:
BEGIN
DBMS_REDACT.ADD_POLICY(
object_schema => 'HR',
object_name => 'employees',
column_name => 'commission_pct',
policy_name => 'redact_com_pct',
function_type => DBMS_REDACT.FULL,
expression => '1=1');
END;
/
And not let’s connect as HR and retrieve some data from employees including the redacted column
“commission_pct”:
As you can see original data was replaced with zero values, if the redacted column was string, null was returned from redaction policy.
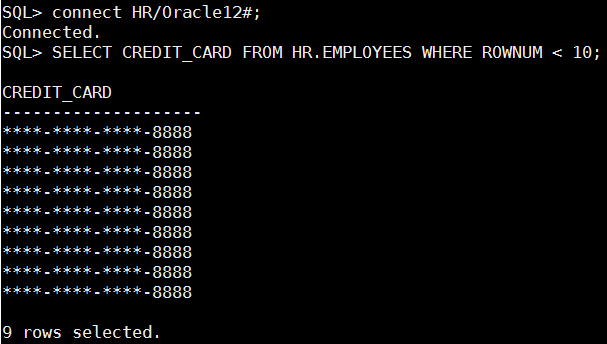
It is time do more complicated redaction and return part of the original value but mask all the rest, the below policy is used to redact credit_card column of employees table. Notice that I have used ” DBMS_REDACT.PARTIAL” function
with the following parameters – ‘VVVVFVVVVFVVVVFVVVV,VVVV-VVVV-VVVV-VVVV,,1,12′ – for every row that credit_card data matches this pattern – “VVVVFVVVVFVVVVFVVVV”, replace it with this pattern “VVVV-VVVV-VVVV-VVVV” and replace the first 12 characters with ““.
DBMS_REDACT.ADD_POLICY(
object_schema => 'HR',
object_name => 'employees',
column_name => 'credit_card',
policy_name => 'redact_credit_card',
function_type => DBMS_REDACT.PARTIAL,
function_parameters => 'VVVVFVVVVFVVVVFVVVV,VVVV-VVVV-VVVV-VVVV,*,1,12',
expression => '1=1');
END;
/
And this is how it looks like when trying to query credit_card column:
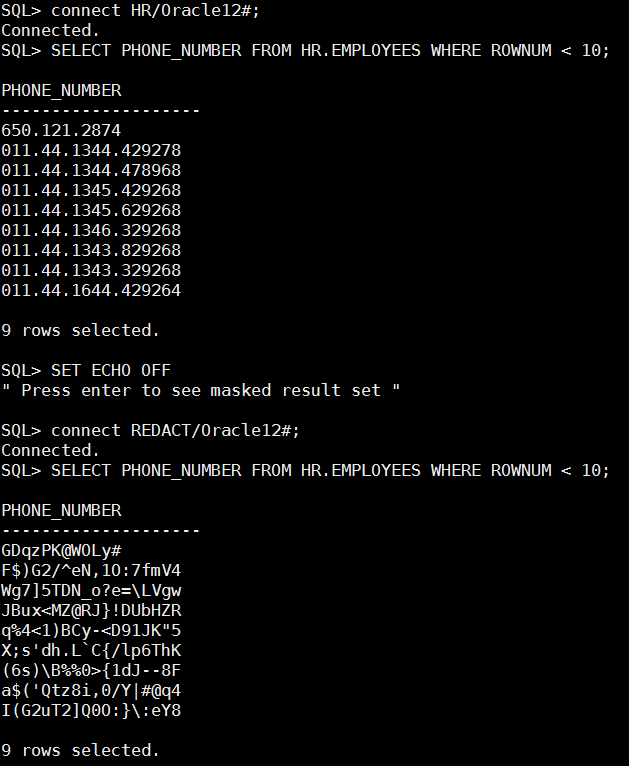
Up until now we have used “expression => ‘1=1’” on all of our redaction policies, this means that data will be reduced whenever the redacted column is accessed. Oracle data redaction can conditionally redact data making original data available for some and redacted for all others. The below policy replaces phone_number column with random values only for database user – REDACT.
BEGIN
DBMS_REDACT.ADD_POLICY(
object_schema => 'HR',
object_name => 'employees',
column_name => 'phone_number',
policy_name => 'redact_cust_rand_vals',
function_type => DBMS_REDACT.RANDOM,
expression => 'SYS_CONTEXT(''USERENV'',''SESSION_USER'') = ''REDACT''');
END;
/
Notice that when data is queried using user HR original data is retrieved and when REDACT user queries the table data is redacted.
Last but not least, DBMS_REDACT provide ALTER_POLICY capabilities to alter existing policies, I can’t show this online but you have to trust me on this one DBMS_REDACT.ALTER_POLICY changes the policy on the fly, next time the redacted object will be accessed new redaction policy will be active, no need to reconnect sessions or restart the data base.
BEGIN
DBMS_REDACT.ALTER_POLICY(
object_schema => 'HR',
object_name => 'employees',
policy_name => 'redact_cust_rand_vals',
action => DBMS_REDACT.MODIFY_EXPRESSION,
expression => 'SYS_CONTEXT(''USERENV'',''SESSION_USER'') != ''REDACT''');
END;
/
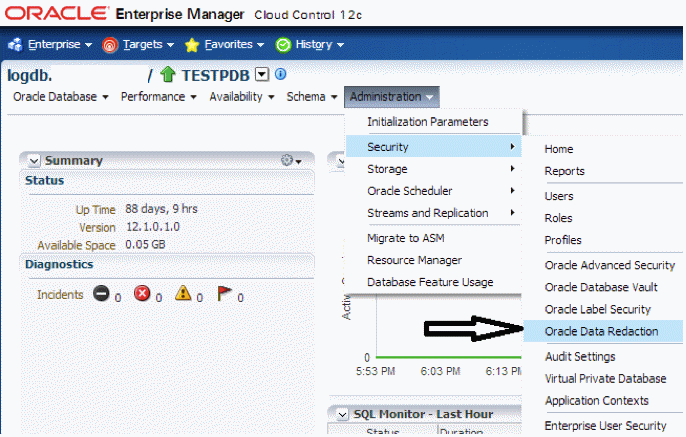
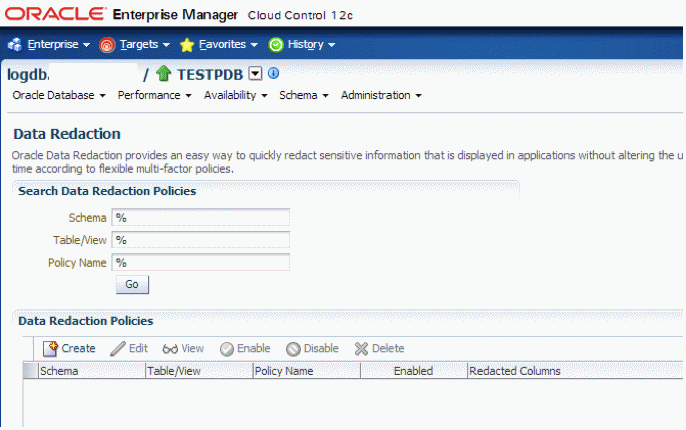
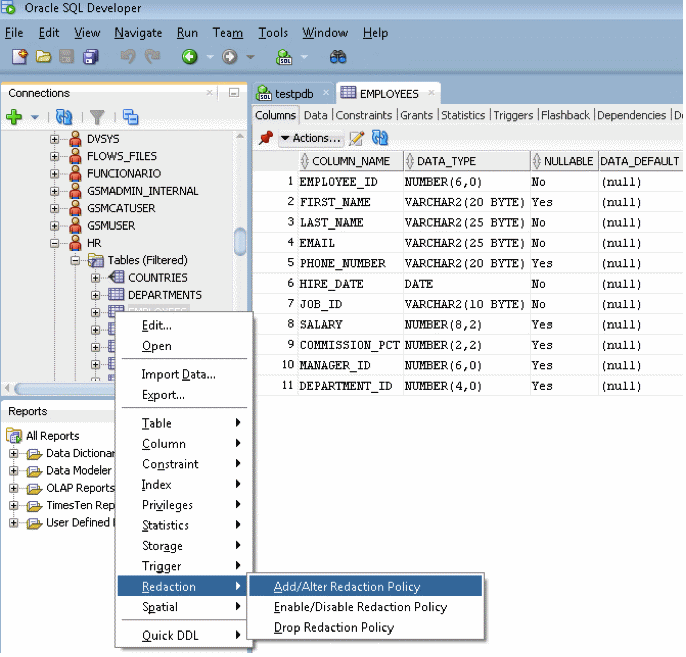
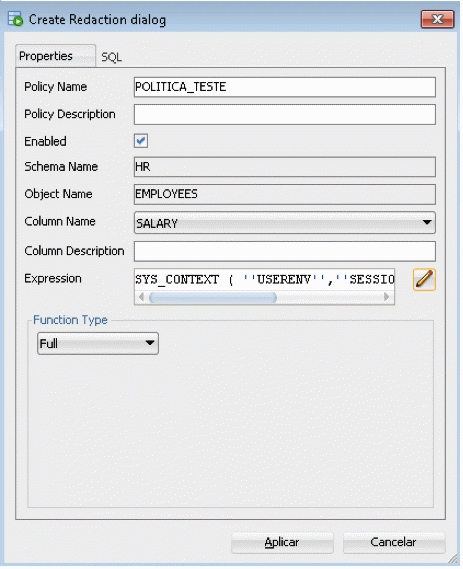
Accessing Oracle Data Redaction from oem:
Screen Management Policies:
Creating a policy to redact the data from the salary column of EMPLOYEES table for all users apart from the user named SUPERVISOR:
Verifying if the policy works as desired:
[oracle@dibutu ~]$ sqlplus funcionario/senha@localhost:1521/testpdb
SQL*Plus: Release 12.1.0.1.0 Production on Wed Apr 2 10:22:46 2014
Copyright (c) 1982, 2013, Oracle.  All rights reserved.

Connected to:
Oracle Database 12c Enterprise Edition Release 12.1.0.1.0 - 64bit Production
With the Partitioning, Automatic Storage Management, OLAP, Advanced Analytics
and Real Application Testing options

SQL> select EMPLOYEE_ID, FIRST_NAME, SALARY from hr.employees WHERE ROWNUM < 5;

EMPLOYEE_ID FIRST_NAME               SALARY
----------- -------------------- ----------
        100 Steven                        0
        101 Neena                         0
        102 Lex                           0
        103 Alexander                     0
Querying the table again, this time connected as the user SUPERVISOR:
[oracle@dibutu ~]$ sqlplus supervisor/senha@localhost:1521/testpdb
SQL*Plus: Release 12.1.0.1.0 Production on Wed Apr 2 10:26:04 2014
Copyright (c) 1982, 2013, Oracle.  All rights reserved.

Connected to:
Oracle Database 12c Enterprise Edition Release 12.1.0.1.0 - 64bit Production
With the Partitioning, Automatic Storage Management, OLAP, Advanced Analytics
and Real Application Testing options

SQL> select EMPLOYEE_ID, FIRST_NAME, SALARY from hr.employees WHERE ROWNUM < 5;

EMPLOYEE_ID FIRST_NAME               SALARY
----------- -------------------- ----------
        100 Steven                    24000
        101 Neena                     17000
        102 Lex                       17000
        103 Alexander                  9000
Creating the same policy using SQLDeveloper:
Invisible Columns :
We can make a column invisible.
SQL> create table test (column-name column-type invisible);
SQL> alter table table-name modify column-name invisible;
SQL> alter table table-name modify column-name visible;
Drop Index Online :
- We can drop an index online.
- SQL> DROP INDEX ONLINE.
Drop constraints Online :
- We can drop an constraint online.
- SQL> DROP CONSTRAINT ONLINE
Other General :
- RESOURCE role does not include UNLIMITED TABLESPACE anymore.
###########################################################
###########################################################
12c New Background Process
BWnn Database Writer Processes
FENC Fence Monitor Process
IPC0 IPC Service Background Process
LDDn Global Enqueue Service Daemon Helper Slave
LGnn Log Writer Worker
LREG Listener Registration Process
OFSD Oracle File Server Background Process
RPOP Instant Recovery Repopulation Daemon
SAnn SGA Allocator
SCRB ASM Disk Scrubbing Master Process
SCRn ASM Disk Scrubbing Slave Repair Process
SCVn ASM Disk Scrubbing Slave Verify Process
BWnn – Database Writer Processes
There can be 1 to 100 Database Writer Processes. The names of the first 36 Database Writer Processes are DBW0-DBW9 and DBWa-DBWz. The names of the 37th through 100th Database Writer Processes are BW36-BW99. The database selects an appropriate default setting for the DB_WRITER_PROCESSES parameter or adjusts a user-specified setting based on the number of CPUs and processor groups.
FENC – Fence Monitor Process
FENC Processes fence requests for RDBMS instances which are using Oracle ASM instances.
IPC0 – IPC Service Background Process
Common background server for basic messaging and RDMA primitives based on IPC (Inter-process communication) methods.
LDDn – Global Enqueue Service Daemon Helper Slave
Helps the LMDn processes with various tasks.
LGnn – Log Writer Worker
On multiprocessor systems, LGWR creates worker processes to improve the performance of writing to the redo log. LGWR workers are not used when there is a SYNC standby destination. Possible processes include LG00-LG99.
LREG – Listener Registration Process
Registers the instance with the listeners.
OFSD – Oracle File Server Background Process
Serves file system requests submitted to an Oracle instance.
RPOP – Instant Recovery Repopulation Daemon
Responsible for re-creating and/or repopulating data files from snapshot files and backup files.
SAnn – SGA Allocator
Allocates SGA. The SAnn process allocates SGA in small chunks. The process exits upon completion of SGA allocation.
SCRB – ASM Disk Scrubbing Master Process
Coordinates Oracle ASM disk scrubbing operations.
SCRn – ASM Disk Scrubbing Slave Repair Process
Performs Oracle ASM disk scrubbing repair operation.
SCVn – ASM Disk Scrubbing Slave Verify Process
Performs Oracle ASM disk scrubbing verify operation.
###########################################################
###########################################################
Performance Tuning :
Adaptive Query Optimization
Before to 12c, all the sql tuning features like ACS, SQL Profiles, SQL Outlines, SPM etc are for proactive tuning and plan stability. There is no way around to decide and change the optimizer decision on fly during the execution of a sql statement.
Since 12c, Oracle introduced the set of capabilities called "adaptive query optimization" that changes the optimizer decision on fly during the execution of a statement. This means the execution plan may initially choose hash join but if that is not correct this may change on fly to nested loops. Further more is that now all execution plans and statistics can be stored in SYSAUX tables and if a query runs next time it will compare the previous execution statistics and can change the execution plan or can choose to collect statistics on fly etc using a set of directive
Let's look closely what does they mean to us.
To start using this capabilities, the following parameters must be set
OPTIMIZER_FEATURES_ENABLE set to 12.1.0.1 above
OPTIMIZER_ADAPTIVE_REPORTING_ONLY set to false
optimizer_adaptive_features set to TRUE
If the above are set, there are four enhancements you will see Oracle 12c uses.
1) Adapative Plans
2) SQL Plan directives
3) Dynamic statistics
4) Automatic re-optimization
1) Adapative Plans
When a query runs first time, Optimizer usually estimates and present a optimal plan based on the statistics available. Ocassionaly (not true majority ) optimizer picks a suboptimal plan due to some misestimates. So the query run time or performance can impact. What if , if the plan can adapt a new join method i.e switch basically a new plan on fly. If so, the optimizer defer the estimated and changes it run time. The estimations that has been kept in the plan will be discarded and uses new final plan during execution.
The ability to adapt the plan at run time based on actual execution statistics results in a more optimal final plan. After choosing the final plan, the optimizer uses it for subsequent executions, thus ensuring that the suboptimal plan is not reused.
Comes in two different flavour's
1) Influencing join methods by switch the nested loops to hash join and vice versa
2) Influencing the parallel distribution method by introducing hybrid hash mechanism
One can find whether the plan is adapted, it can be two ways
a) The note section of a execution plan contains the following
- adaptive plan has been used
b) v$sql.is_resolved_adaptive_plan = Y means the query is adaptive
2) SQL Plan directives
A SQL plan directive is additional information that the optimizer uses to generate a more optimal plan. For example, when the database joins two tables that have a data skew in their join columns, a SQL plan directive can direct the optimizer to use dynamic statistics to obtain an accurate cardinality estimate.The optimizer collects SQL plan directives on query expressions rather than at the statement level. In this way, the optimizer can apply directives to multiple SQL statements. The database automatically maintains directives, and stores them in the SYSAUX tablespace. You can manage directives using the package DBMS_SPD.
By default every 15 minutes this sql plan directives are flushed to sysaux as they collect automatically.
Columns V$SQL=is_reoptimizable columns value 'Y' tells whether this query needs reoptimization if so the next execution will use all sorts of reoptimization techninques using SQL Plan directives exists.
You can view DBA_SQL_PLAN_DIRECTIVES, DBA_SQL_PLAN_DIR_OBJECTS to view the objects used in statement were been used of which technique.
3) Dynamic statistics
When an object statistics missing during execution, Oracle optimizer will collect the statistics based on sampling of blocks (optimizer_dynamic_sampling level 2 etc). But this can be very misleading sometimes since sampling can be inaccurate.
From 12c, onwards a new level has been introduced i.e setting optimizer_dynamic_sampling to level 11) causes optimizer "AUTOMATICALLY DETERMINES " to collect the statistics run time of execution which eases your job if you are unsure of the data trend and tries to utilize the new statistics. Albeit the query execution time will increase ofcourse.
4) Automatic re-optimization
As you see above, The optimizer defers the plan and re-assess the join methods from nested loops to hash join or vice versa (as of now 12c Release 1). But consider a scenario, a join order situation which perform sub optimally due to cardinality misestimate in those cases Oracle optimizer now utilizes the technique called Automatic re-optimization. Adaptive plans will change in first execution itself where in the automatic re-optimization works for the second time of execution of statement.
Earlier to 12c, the execution statistics were not persistent and not available to the optimizer immediately, now they store in sysaux tablespace and optimizer quickly get them and use them for further to improvise the plans. It will try to optimize every time the statement runs and keep storing the information unlike discarding the old plans. So this can be steps (as of my understanding)
a) When a statement executes first time,
1) Optimizer estimates the plan and execute it
2) At end, optimizer compare the execution statistics with estimated statistics
3) If it found differs, (for example e-rows differs than a-rows), then optimizer marks it as re-optimization for next run
4) Creates SQL Plan directives and stores
b) Upon next run, The optimizer see that this statement is need to reoptimized and see what kind of optimization technique it should use. It can use either of the following depending on cases.
a) For example, if a object has missing stats, and dynamic sampling set to 11(new) level then it uses the feature "Dynamic statistics" and gather the statistics run time
b) For example, if a cardinality misestimate happens in a join order, then it uses the technique called "Statistics feedback(formerly known as cardinality feedback) or "performance feedback" i.e switching from serial to parallel execution (Adaptive parallelism if DOP set as adaptive)
Note: In both the cases above SQL Plan directives that gathered for previous execution will be used and performed accordingly.
Finally, the statement will be executed with new plan and optimizer again compare the execution statistics and estimated statisitcs, if it found both same it marks this statement is_reoptimizable as NO. If it's not then the above cycle continues. Optimizer learns everytime and tries to reoptimize the statement everytime. (ofcourse many child cursors, many parses etc)
Adaptive feature caused performance in Oracle 12c and we can disable same as below
12.1
--Disable
alter system set optimizer_adaptive_features=false scope=both;
--Enable
alter system set optimizer_adaptive_features=true scope=both;
12.2
--Disable
ALTER SYSTEM SET OPTIMIZER_ADAPTIVE_PLANS = FALSE SCOPE=BOTH;
--Enable
ALTER SYSTEM SET OPTIMIZER_ADAPTIVE_PLANS = TRUE SCOPE=BOTH;
ALTER SYSTEM SET OPTIMIZER_ADAPTIVE_STATISTICS = TRUE SCOPE=BOTH;
--Disable
ALTER SYSTEM SET OPTIMIZER_ADAPTIVE_STATISTICS = FALSE SCOPE=BOTH;
we can set this hidden parameter:
alter system set "_optimizer_dsdir_usage_control"=0 scope=both;
Dynamic Sampling is also caused performance issue, So, we can also disable with following parameter
alter system set optimizer_dynamic_sampling=0 scope=both
Automatic generation of extended statistics
Extended statistics can be very helpful to the optimizer by establishing a dependency between two or more columns in a table. Such dependencies can improve cardinality estimates the optimizer uses to determine the best plan of attack for a query. Extended statistics have been available since 11.2.0.x, and now Oracle 12.1.0.2 improves on that by generating extended statistics automatically. Using a feature called Automatic Column Group detection, Oracle can recognize column dependencies and create extended statistics on those recognized groups.
On checking Statspack report of Oracle Database following query is consuming CPU.
select default$ from col$ where rowid=:1
Statspack Report:
SQL ordered by CPU DB/Inst: IC/ic Snaps: 8812-8823
-> Total DB CPU (s): 2,637
-> Captured SQL accounts for 15.8% of Total DB CPU
-> SQL reported below exceeded 1.0% of Total DB CPU
CPU CPU per Elapsd Old
Time(s) Executions Exec(s) %Total Time(s) Buffer Gets Hash Value
------- ---------- ------- ------ ------- ----------- ----------
75.39 2,610,891 0.00 2.9 79.09 5,221,732 3360804353
select default$ from col$ where rowid=:1
Solution:
1. For stop using extended stats in Oracle 12c. You can disable the hidden parameter.
alter system set "_optimizer_enable_extended_stats"=FALSE scope=both;
2. You can also change cursor sharing parameter to “FORCE” if your application is using hard parsing(but not recommended)
alter session set cursor_sharing='force' scope=both;
3. You can drop the already created extended stats by following process:
Check the extended stats extension for owner and table:
SELECT extension_name, extension FROM dba_stat_extensions WHERE table_name = 'EMP' and owner ='SCOTT'
If you find the column group or extension present on table, you can take backup of stats and drop the extension (column group) from database by following package:
Note: copy paste extension column of above query to following command:
Drop Command:
exec dbms_stats.drop_extended_stats(ownname => 'SCOTT',tabname => 'EMP',extension => '("ENTITY_NO","ACCT_TYPE","DOC_TYPE")');
In my case, By deleting the extended stats will fixed the performance issue in Oracle 12c.
Scripts for drop all the table and schema extended stats
spool E:\stats.txt
SET LINESIZE 32000;
SET PAGESIZE 40000;
SET LONG 50000;
SET TRIMSPOOL ON
SET WRAP ON
set termout off
set verify off
set longchunksize 200000
set feedback off
SET HEADING Off
set echo off
SELECT 'exec dbms_stats.drop_extended_stats(ownname =>'''||owner ||''',tabname =>'''||table_name||''',extension => '''|| extension||''');' FROM dba_stat_extensions WHERE owner ='SCOTT';
EMERGENCY MONITORING
If you are struggling to connect to the main performance pages for the target database, you can use emergency monitoring. The “Emergency Monitoring” menu option is available under the “Performance” section once you’ve navigated to the target database.
Its more of 12c Oem new feature rather database new feature .
- Emergency monitoring is meant for extreme circumstances where it’s impossible for you to connect to the database because the database is hung.
- Emergency monitoring allows you to connect to the database in diagnostic mode and run a lightweight analysis to see what’s happening.
- You can access real-time performance data from ASH and access the hang analysis data.
- Unlike in 11g, you don’t have to explicitly activate the memory access mode, emergency monitoring connects directly to the SGA to retrieve the necessary data.
- Emergency monitoring can be monitor by command prompt also.
The resul screen shows “Host : Runnable Processes”, “Average Active Sessions”, “I/O” and “Hang Analysis”.

Compare ADDM

Oracle 12c has added this functionality into the DBMS_ADDM package, so it is now possible to compare ADDM periods without using Cloud Control.
This functionality requires Enterprise Edition and the Diagnostics and Tuning option. Make sure you have the correct licensing before using this functionality.
Snapshots
COMPARE_DATABASES
COMPARE_INSTANCES
Real Application Testing
COMPARE_DATABASES
The COMPARE_DATABASES function produced a HTML or XML report comparing two time periods of the same database or two different databases. When comparing two databases, all AWR data must reside locally. If the BASE_DBID and COMP_DBID parameters are omitted or set to NULL, the current database is assumed. The REPORT_TYPE parameter determines if the report is in HTML or XML format. The examples below show how to produce both types of report for the current database.
SET LONG 1000000 LONGCHUNKSIZE 1000000
SET LINESIZE 1000 PAGESIZE 0
SET TRIM ON TRIMSPOOL ON
SET ECHO OFF FEEDBACK OFF
SPOOL /tmp/addm_compare_db_report.html
SELECT DBMS_ADDM.compare_databases (
base_begin_snap_id => 1962,
base_end_snap_id => 1964,
comp_begin_snap_id => 1970,
comp_end_snap_id => 1972,
report_type => 'HTML') AS report
FROM dual;
SPOOL OFF
SPOOL /tmp/addm_compare_db_report.xml
SELECT DBMS_ADDM.compare_databases (
base_begin_snap_id => 1962,
base_end_snap_id => 1964,
comp_begin_snap_id => 1970,
comp_end_snap_id => 1972,
report_type => 'XML') AS report
FROM dual;
SPOOL OFF
COMPARE_INSTANCES
The COMPARE_INSTANCES function produced a HTML or XML report comparing two time periods of the same instance or two different instances. This is especially useful for comparing RAC instances. When comparing two instances from different databases, all AWR data must reside locally. If the BASE_DBID and COMP_DBID parameters are omitted or set to NULL, the current database is assumed. The BASE_INSTANCE_ID and COMP_INSTANCE_ID parameters specify the instances to be compared. The REPORT_TYPE parameter determines if the report is in HTML or XML format. The examples below show how to produce both types of report for the current database and instance.
SET LONG 1000000 LONGCHUNKSIZE 1000000
SET LINESIZE 1000 PAGESIZE 0
SET TRIM ON TRIMSPOOL ON
SET ECHO OFF FEEDBACK OFF
SPOOL /tmp/addm_compare_inst_report.html
SELECT DBMS_ADDM.compare_instances (
base_instance_id => 1,
base_begin_snap_id => 1962,
base_end_snap_id => 1964,
comp_instance_id => 1,
comp_begin_snap_id => 1970,
comp_end_snap_id => 1972,
report_type => 'HTML') AS report
FROM dual;
SPOOL OFF
SPOOL /tmp/addm_compare_inst_report.xml
SELECT DBMS_ADDM.compare_instances (
base_instance_id => 1,
base_begin_snap_id => 1962,
base_end_snap_id => 1964,
comp_instance_id => 1,
comp_begin_snap_id => 1970,
comp_end_snap_id => 1972,
report_type => 'XML') AS report
FROM dual;
SPOOL OFF
Index Usage Tracking (DBA_INDEX_USAGE, V$INDEX_USAGE_INFO) in Oracle Database 12c Release 2 (12.2)
Index usage tracking in Oracle 12.2 replaces the old index monitoring functionality of previous versions. This article is essentially a rewrite of the previous Index Monitoring article, bringing it in line with Oracle Database 12c Release 2 (12.2).
DBA_INDEX_USAGE displays cumulative statistics for each index.
V$INDEX_USAGE_INFO keeps track of index usage since the last flush. A flush occurs every 15 minutes.
After each flush, ACTIVE_ELEM_COUNT is reset to 0 and LAST_FLUSH_TIME is updated to the current time
REAL-TIME ADDM
- Real-Time ADDM unlike Emergency Monitoring is used to analyze the root cause of the hung.
- Real-Time ADDM works like the normal ADDM but access only the last 10 minutes of ASH data to provide recommendations.
- Because Real-Time ADDM only uses data from memory you can still access it when the database is hung.
- You can use Real-Time ADDM triggers to proactively monitor the performance of an instance.
- High load
- I/O bound
- CPU bound
- Over-allocated memory
- Interconnect bound
- Session limit
- Process limit
- Hung session
- Deadlock detected
- Reports can be viewed in DBA_HIST_REPORTS and DBA_HIST_REPORTS_DETAILS.
- To manually generate a report you can use the following procedure (Using the DBMS_ADDMPackage)
SQL> select dbms_addm.real_time_addm_report() from dual;
You can also generate an ADDM report using the EM Database Express by going to the performance hub et click on “Current ADDM findings“.
Adaptive Sql Plan Management (SPM) in Oracle Database 12c
* The optimizer is able to adapt plans on the fly by predetermining multiple subplans for portions of the plan.
* Adaptive plans, introduced in Oracle Database 12c, enable the optimizer to defer the final plan decision for a statement until execution time. The optimizer instruments its chosen plan (the default plan) with statistics collectors so that it can detect at runtime, if its cardinality estimates differ greatly from the actual number of rows seen by the operations in the plan. If there is a significant difference, then the plan or a portion of it will be automatically adapted to avoid suboptimal performance on the first execution of a SQL statement.
With adaptive SQL plan management, DBAs no longer have to manually run the
verification or evolve process for non-accepted plans. When automatic SQL tuning is in
COMPREHENSIVE mode, it runs a verification or evolve process for all SQL statements that have non-accepted plans during the nightly maintenance window. If the non-accepted plan performs better than the existing accepted plan (or plans) in the SQL plan baseline, then the plan is automatically accepted and becomes usable by the optimizer. After the verification is complete, a persistent report is generated detailing how the non-accepted plan performs compared to the accepted plan performance. Because the evolve process is now an AUTOTASK, DBAs can also schedule their own evolve job at end time.
The evaluation can be run manually with DBMS_SPM package, SPM Evolve Advisor or the Automatic SQL Tuning advisor.
This can be set in EM or through DBMS_AUTO_TASK_ADMIN package. This procedure show the setup of SPM.
if proven to perform well and we can enable or disable this setting by setting up the parameter for Auto Evolution Task as follows :=
BEGIN
DBMS_SPM.SET_EVOLVE_TASK_PARAMETER(
task_name => 'SYS_AUTO_SPM_EVOLVE_TASK'
, parameter => 'ACCEPT_PLANS'
, value => 'true'
);
END;
/
SELECT PARAMETER_NAME, PARAMETER_VALUE AS "VALUE" FROM DBA_ADVISOR_PARAMETERS WHERE ( (TASK_NAME = 'SYS_AUTO_SPM_EVOLVE_TASK') AND
( (PARAMETER_NAME = 'ACCEPT_PLANS') OR (PARAMETER_NAME = 'TIME_LIMIT') ) );
Listed Bug :
Document 11719151.8 Bug 11719151 - SQL Plan Management capture causes slowness
Full Database Caching Mode
To force full database caching, you will need to do the following.
CONN / AS SYSDBA
SHUTDOWN IMMEDIATE;
STARTUP MOUNT;
ALTER DATABASE FORCE FULL DATABASE CACHING;
ALTER DATABASE OPEN;
SELECT force_full_db_caching FROM v$database;
Disabling force full database caching mode follows a similar format.
CONN / AS SYSDBA
SHUTDOWN IMMEDIATE;
STARTUP MOUNT;
ALTER DATABASE NO FORCE FULL DATABASE CACHING;
ALTER DATABASE OPEN;
Historical Sql Monitoring Report:
In 12c we can pull a report for a historical execution, granted the execution was expensive enough
to candidate for collection. I didn’t investigate the details of the automatic collection yet but there are two ways,
details from DBA_HIST_REPORTS_CONTROL:
REGULAR – per-minute report capture subject to DBTIME budget
FULL_CAPTURE – capture will be run per minute without the DBTIME budget constraints
The FULL_CAPTURE can be enabled using DBMS_AUTO_REPORT.START_REPORT_CAPTURE/FINISH_REPORT_CAPTURE.
Info about each automatically collected report are stored in DBA_HIST_REPORTS and the report itself (in XML format) is stored in DBA_HIST_REPORTS_DETAILS.
The whole framework is also used for Real-Time ADDM so the DBA_HIST_REPORTS* views are not organized in a SQL Monitor-friendly way (ie. SQL ID/SQL Exec ID/SQL Exec Start) but rather in a report-oriented way, the key is REPORT_ID.
Column COMPONENT_NAME helps track down the source of the report, “sqlmonitor” in this case.
A summary of the report is stored in REPORT_SUMMARY in XML format, so a simple SQL like the following pulls the list of REPORT_ID/SQL_ID (plus anything else you may want to extract from the summary, ie. SQL Exec ID and SQL Exec Start):
SELECT report_id,
EXTRACTVALUE(XMLType(report_summary),'/report_repository_summary/sql/@sql_id') sql_id,
EXTRACTVALUE(XMLType(report_summary),'/report_repository_summary/sql/@sql_exec_id') sql_exec_id,
EXTRACTVALUE(XMLType(report_summary),'/report_repository_summary/sql/@sql_exec_start') sql_exec_start
FROM dba_hist_reports
WHERE component_name = 'sqlmonitor'
Using the REPORT_ID we can now extract the report in different format (HTML, TEXT, ACTIVE, XML) using DBMS_AUTO_REPORT.REPORT_REPOSITORY_DETAIL
SQL> set long 10000000 longchunksize 10000000 pages 0
SQL> SELECT DBMS_AUTO_REPORT.REPORT_REPOSITORY_DETAIL(RID => 1022, TYPE => 'text')
FROM dual;
Historical SQL monitoring report can be extracted using Performance hub report either through EM or using command-line. Under "Monitored SQL" section of the historical performance hub report shows the historical SQL monitoring information.
Document 2436566.1 Monitoring Database Performance Using Performance Hub Report
Example: To generate Performance Hub in historical mode through command line.
SQL> set pages 0 linesize 32767 trimspool on trim on long 1000000 longchunksize 10000000
SQL> spool perfhub_history.html
SQL> select dbms_perf.report_perfhub(is_realtime=>0,type=>'active',selected_start_time=>to_date('10-SEP-18 04:00:00','dd-MON-YY hh24:mi:ss'),selected_end_time=>to_date('10-SEP-18 05:00:00','dd-MON-YY hh24:mi:ss')) from dual;
SQL> spool off
Historical SQL monitoring report can be extracted for particular SQL statement using SQL Details report.
Example: To generate SQL details report to get the SQL monitoring information for particular SQL statement in historical mode.
SQL> set pages 0 linesize 32767 trimspool on trim on long 1000000 longchunksize 10000000
SQL> spool sql_details_history.html
SQL> select dbms_perf.report_sql(sql_id=>'9vkyyg1xj6fgc',is_realtime=>0,type=>'active',selected_start_time=>to_date('10-SEP-18 04:00:00','dd-MON-YY hh24:mi:ss'),selected_end_time=>to_date('10-SEP-18 05:00:00','dd-MON-YY hh24:mi:ss')) from dual;
SQL> spool off
Optimizer Statistics Advisor in 12.2
The Optimizer Statistics Advisor runs a task called AUTO_STATS_ADVISOR_TASK during the maintenance window, so by default you don't need to do anything to start seeing advice about your database statistics. Like other advisors, we use the DBA_ADVISOR_EXECUTIONS view to identify the executions of interest.
CONN / AS SYSDBA
ALTER SESSION SET CONTAINER= pdb1;
ALTER SESSION SET NLS_DATE_FORMAT='DD-MON-YYYY HH24:MI:SS';
SET LINESIZE 150
COLUMN task_name FORMAT A25
COLUMN execution_name FORMAT A20
COLUMN execution_end FORMAT A20
COLUMN execution_type FORMAT A20
SELECT task_name,
execution_name,
execution_start,
execution_end,
execution_type,
status
FROM dba_advisor_executions
WHERE task_name = 'AUTO_STATS_ADVISOR_TASK'
AND execution_end >= SYSDATE-2
ORDER BY 3;
The following query displays the default report for the latest execution for the AUTO_STATS_ADVISOR_TASK task.
SET LINESIZE 200
SET LONG 1000000
SET PAGESIZE 0
SET LONGCHUNKSIZE 100000
SELECT DBMS_STATS.report_advisor_task('AUTO_STATS_ADVISOR_TASK') AS REPORT FROM dual;
The following code implements the recommendations and displays the result.
VARIABLE v_result CLOB
-- Implement recommendations.
DECLARE
l_task_name VARCHAR2(32767);
BEGIN
l_task_name := 'AUTO_STATS_ADVISOR_TASK';
:v_result := DBMS_STATS.implement_advisor_task(l_task_name);
END;
/
###########################################################
###########################################################
New Parameters in 12c :
When non Container database was created below new parameters were noticed by me
| Parameter name | Value |
| |
| allow_global_dblinks | FALSE |
| allow_group_access_to_sga | FALSE |
| approx_for_aggregation | FALSE |
| approx_for_count_distinct | FALSE |
| approx_for_percentile | none |
| asm_io_processes | 20 |
| autotask_max_active_pdbs | 2 |
| awr_pdb_autoflush_enabled | FALSE |
| cdb_cluster | FALSE |
| cdb_cluster_name | test1 |
| clonedb_dir | |
| common_user_prefix | C## |
| connection_brokers | ((TYPE=DEDICATED)(BROKERS=1)), ((TYPE=EMON)(BROKERS=1)) |
| containers_parallel_degree | 65535 |
| cursor_invalidation | IMMEDIATE |
| data_guard_sync_latency | 0 |
| data_transfer_cache_size | 0 |
| db_big_table_cache_percent_target | 0 |
| db_index_compression_inheritance | TABLESPACE |
| db_performance_profile | |
| DBFIPS_140 | FALSE |
| default_sharing | metadata |
| disable_pdb_feature | 0 |
| enable_automatic_maintenance_pdb | TRUE |
| enable_dnfs_dispatcher | FALSE |
| enable_pluggable_database | FALSE |
| enabled_PDBs_on_standby | * |
| exafusion_enabled | 1 |
| external_keystore_credential_location | |
| inmemory_adg_enabled | TRUE |
| inmemory_clause_default | |
| inmemory_expressions_usage | ENABLE |
| inmemory_force | DEFAULT |
| inmemory_max_populate_servers | 0 |
| inmemory_query | ENABLE |
| inmemory_size | 0 |
| inmemory_trickle_repopulate_servers_percent | 1 |
| inmemory_virtual_columns | MANUAL |
| instance_abort_delay_time | 0 |
| instance_mode | READ-WRITE |
| long_module_action | TRUE |
| max_datapump_jobs_per_pdb | 100 |
| max_idle_time | 0 |
| max_iops | 0 |
| max_mbps | 0 |
| max_pdbs | 4098 |
| max_string_size | STANDARD |
| noncdb_compatible | FALSE |
| ofs_threads | 4 |
| one_step_plugin_for_pdb_with_tde | FALSE |
| optimizer_adaptive_plans | TRUE |
| optimizer_adaptive_reporting_only | FALSE |
| optimizer_adaptive_statistics | FALSE |
| optimizer_inmemory_aware | TRUE |
| pdb_file_name_convert | |
| pdb_lockdown | |
| pdb_os_credential | |
| pga_aggregate_target | 965738496 |
| remote_recovery_file_dest | |
| resource_manage_goldengate | FALSE |
| sga_min_size | 0 |
| shrd_dupl_table_refresh_rate | 60 |
| spatial_vector_acceleration | FALSE |
| standby_db_preserve_states | NONE |
| target_pdbs | 0 |
| temp_undo_enabled | FALSE |
| threaded_execution | FALSE |
| unified_audit_sga_queue_size | 1048576 |
| uniform_log_timestamp_format | TRUE |
| use_dedicated_broker | FALSE |