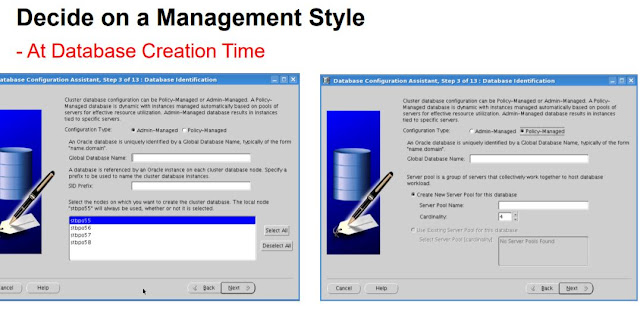
There are two methods to manage your cluster database.
1) Administrator Managed database
2) Policy Managed Database ( Introduced in 11g R2 )
Administrator Managed database
Administrator Managed Database : In Administrator Managed database , a DBA manages each instance of the database by defining specific instances to run on specific nodes in the cluster.It is traditional way of cluster management.
When you define a service for an administrator managed database, you define which instances support that service. These are known as the PREFERRED instances.
You can also define other instances to support a service if the service’s preferred instance fails. These are known as AVAILABLE instances.
Policy Managed Database
Policy Managed Database : It’s a new method to manage clustered database.It is introduced to help implement dynamic grid configurations.
In Policy Managed database , DBA is required only to define the cardinality(number of database required).
Oracle Clusterware manages the allocation of nodes to run the instances and Oracle RAC allocates the required redo threads and undo tablespaces as needed.
Service for Policy managed database are defined as UNIFORM and SINGLETON.
UNIFORM : Running on all instances in the server pool
SINGLETON : Running on only one instance in the server pool.For singleton services, RAC chooses on which instance in the server pool the service is active.
If that instance fails, then the service fails over to another instance in the pool. A service can only run in one server pool.
Some benefits of the Policy-Managed configuration:
Provides distribution according to demand.
Manages business requirements effectively.
Scales just in time.
Maximizes data center efficiency.
By default, there are two server pools, GENERIC and FREE. We can display existing pools as follows.
-bash-4.3$ srvctl config srvpool
Server pool name: Free
Importance: 0, Min: 0, Max: -1
Candidate server names:
Server pool name: Generic
Importance: 0, Min: 0, Max: -1
Candidate server names: racdb1,racdb2
Features of server pools :
min : (-l)
The minimum number of servers that must be protected in the server pool.
max : (-u)
Maximum number of servers allowed in server pool.
imp : (-i)
By following these steps, you can convert a database that is created as Admin-Managed to a Policy-Managed database.
First, let’s look at our current configuration.
$ srvctl config database -d RACDB
Database unique name: RACDB
Database name: RACDB
Oracle home: /u01/app/oracle/product/11.2.0/dbhome_1
Oracle user: oracle
Spfile: +DATA/RACDB/spfileRACDB.ora
Domain:
Start options: open
Stop options: immediate
Database role: PRIMARY
Management policy: AUTOMATIC
Server pools: RACDB
Database instances: RACDB1,RACDB2
Disk Groups: DATA,RECO
Mount point paths:
Services:
Type: RAC
Database is administrator managed
Let’s create a new pool. The min and max values for the new pool are set to 2.
$ srvctl add serverpool -g testpool -l 2 -u 2
$ srvctl add serverpool -g testpool -l 2 -u 2
When we view existing pools, the pool we just created is visible.
$ srvctl config srvpool
Server pool name: Free
Importance: 0, Min: 0, Max: -1
Candidate server names:
Server pool name: Generic
Importance: 0, Min: 0, Max: -1
Candidate server names: racdb1,racdb2
Server pool name: testpool
Importance: 0, Min: 2, Max: 2
Candidate server names:
$ srvctl config srvpool
Server pool name: Free
Importance: 0, Min: 0, Max: -1
Candidate server names:
Server pool name: Generic
Importance: 0, Min: 0, Max: -1
Candidate server names: racdb1,racdb2
Server pool name: testpool
Importance: 0, Min: 2, Max: 2
Candidate server names:
Now, we can convert our database.
$ srvctl modify database -d RACDB -g testpool
$ srvctl modify database -d RACDB -g testpool
The database configuration will now appear as policy managed.
$ srvctl config database -d RACDB
Database unique name: RACDB
Database name: RACDB
Oracle home: /u01/app/oracle/product/11.2.0/dbhome_1
Oracle user: oracle
Spfile: +DATA/RACDB/spfileRACDB.ora
Domain:
Start options: open
Stop options: immediate
Database role: PRIMARY
Management policy: AUTOMATIC
Server pools: testpool
Database instances:
Disk Groups: DATA,RECO
Mount point paths:
Services:
Type: RAC
Database is policy managed
Now our database is policy managed. Our database will run when there is an appropriate server for the testpool we created above.
We can check the status of the server repositories as follows.
$ srvctl status serverpool
Server pool name: Free
Active servers count: 0
Server pool name: Generic
Active servers count: 0
Server pool name: testpool
Active servers count: 2
$ srvctl status serverpool
Server pool name: Free
Active servers count: 0
Server pool name: Generic
Active servers count: 0
Server pool name: testpool
Active servers count: 2

Good information..Thanks for sharing
ReplyDelete