We all might heard of guaranteed restore
point . However very few know that we can create guaranteed restore point without enabling flashback .
Fantastic feature called guaranteed restore
point came with Oracle 10G R2. By this feature, you can set a restore point which will
remain until you drop it. The best part of this feature is, it uses db_file_recovery_dest to keep the
changed blocks, even if flashback logging is not enabled for your database. The only thing you must do is setting
db_file_recovery_dest parameter and create a guaranteed restore point (for the first restore point you must be in
mount mode). Before image of changed blocks, will be kept on flashback logs after you
created the guaranteed restore point. Flashback logs of guaranteed restore points
are not big because of keeping before image of changed blocks for only 1 time
after first change.
To create first guaranteed restore point
when flashback off, you first start the database in mount state after a consistent shut down. After opening in
mount state you create your first guaranteed restore point like below.
SQL>CREATE RESTORE POINT before_upgrade
GUARANTEE FLASHBACK DATABASE;
Below are high level steps : before proceeding ensure recover dest size and retention is set
1) Do few
log switches in Primary and Make sure primary and Standby in sync 2) Disable
Dataguard and log shipping . 3)
Comment arch redo maintenance in primary and in standby 4)
create guaranteed restore point on standby - create
restore point BEFORE_REL guarantee flashback database; 5) do a
couple of log switches on primary 6) create
guaranteed restore point PRE_RELEASE on primary 7) continue
to monitor the flashback space
This blog is mainly to give insight of SecureFile .We all face issue for Lob that though we use multiple parallelism for Lob import , it only uses 1 channel for import of Lob data. However if we convert to SecureFile while import it used multiple channels .
In Oracle 12C it’s possible to define LOB storage method during import time independent from export settings. It gives more flexibility during importing data.
If the COMPATIBLE parameter is set to "12.0.0.0" or higher, the default value for the DB_SECUREFILE parameter is "PREFERRED", which means all LOBs will be created as SecureFiles, unless they are explicitly created as BasicFiles or their tablespace uses Manual Segment Space Management.
Prior to 12cR1 Parallel DML (PDML) had a number of restrictions when used against a table containing LOBs (BasicFile or SecureFile). PDML was only supported for the following operations and only if the table containing the LOB was partitioned.
INSERT INTO ... AS SELECT ... CREATE TABLE ... AS SELECT ... DELETE UPDATE MERGE Multitable INSERT
From Oracle Database 12c Release 1 (12.1) onward Oracle supports more parallel operations against partitioned tables containing LOBs (SecureFile and BasicFile).
INSERT INSERT INTO ... AS SELECT ... CREATE TABLE ... AS SELECT ... DELETE UPDATE MERGE Multitable INSERT SQL*Loader Import/Export
The new PREFERRED value is now the default, if the COMPATIBLE init parameter is set to 12.0.0.0 or higher. PREFERRED makes LOBs to be stored as SecureFiles per default, unless the BASICFILE clause is explicitely used when creating the table, or the tablespace is not ASSM. The ALWAYS value still forces the storage as SecureFiles, however, LOBs are stored as BasicFile if the tablespace is not ASSM, instead of raising an error. BasicFile is not banned.
SQL> show parameter db_secure NAME TYPE VALUE ------------------------------------ ----------- ------------------------------ db_securefile string PREFERRED
SQL> select securefile from user_lobs where table_name='TBL_LOB_TEST'; SEC --- YES
The main reason most of us are not able to Open database after restore and recovery is due to below 2 main issues
1) missing required archive logs which results in mismatch in checkpoint# between datafiles
2) Another issue we face is database SCN. is behind datafiles checkpoint#
If datafiles scn are not in sync after restore i,.e it has fuzzy and if you have required archive log then we don't need any special fix rather applying additional required archives .
So the first step we need to do after restore and recovery is to check there is no fuzzy .
###############################################
###############################################
Checking Fuzzy
Fri Jun 05 14:15:15 2015 ALTER DATABASE RECOVER CANCEL Fri Jun 05 14:15:16 2015 Errors in file /ora_data/diag/rdbms/SNORT/SNORT/trace/SNORT_pr00_18570.trc: ORA-01547: warning: RECOVER succeeded but OPEN RESETLOGS would get error below ORA-01194: file 1 needs more recovery to be consistent ORA-01110: data file 1: ‘/ora_data/oradata/SNORT/system01.dbf’ ORA-1547 signalled during: ALTER DATABASE RECOVER CANCEL … ALTER DATABASE RECOVER CANCEL ORA-1112 signalled during: ALTER DATABASE RECOVER CANCEL …
First key thing to check is all your datafile headers are in sync . We can check same using below sql
select CONTROLFILE_TYPE from v$database ;
select FUZZY,count(*) from v$datafile_header group by fuzzy ;
set lines 187
set numwidth 20
set pages 999
alter session set nls_date_format='DD-MON-YYYY:HH24:MI:SS';
select * from v$recover_file;
select min(fhrba_Seq)min_seq, max(fhrba_Seq) max_seq_required from x$kcvfh;
select distinct fuzzy from v$datafile_header;
alter session set nls_date_format='YYYY/MON/DD hh24:mi:ss';
select checkpoint_time,fuzzy,count(*),status
from ( select checkpoint_time,fuzzy,status
from v$datafile_header
union all
select controlfile_time,'CTL',null from v$database)
group by checkpoint_time,fuzzy,status;
How to fix fuzzy and determine archive needed :
1) find archive log needed to fix fuzzy
SQL> -- Check for MIN, and MAX SCN in Datafiles
SQL> select min(CHECKPOINT_CHANGE#), max(CHECKPOINT_CHANGE#) from v$datafile_header ;
-- Use MIN(CHECKPOINT_CHANGE#) 2446300 as found before, then use it with this query to find the
-- first SEQ# 'number' and archivelog file needed for recover to start with.
-- All SEQ# up to the online Current Redolog SEQ# must be available without any gap for successful recovery
-- MIN(CHECKPOINT_CHANGE#) 2446300
SQL> select thread#, sequence#, substr(name,1,80) from v$Archived_log
where 2446300 between first_change# and next_change#;
2) use below to determine max scn till when we need to recover database .
SQL> alter database recover database until change 7203942;
Absolute Fuzzy
In some cases we see that there is no fuzzy however still it shows datafiles header mismatch error while opening database with resetlogs .
Oracle reserves a section of the file header block of each file for just such an occurrence. This is called the Absolute Fuzzy SCN and represents the SCN required for recovery to make this a consistent file. Our bookends are then defined as the checkpoint SCN and the Absolute Fuzzy SCN. At a minimum, Oracle must recover from the checkpoint SCN through the Absolute Fuzzy SCN for consistency. If Oracle did not detect any SCNs higher than the checkpoint SCN during the backup then the backup would be considered consistent (file header status 0x0) and the Absolute Fuzzy SCN would remain at 0x0 - obviating the need for any backup-necessary redo to be applied. As you can see, this is the reason Oracle waits until all data blocks in the file have been read and written before it writes the header to the backup set. This permits the proper settings for the bookends
Follow below to determine archive needed for recovery
SQL> select hxfil file#, substr(hxfnm, 1, 50) name, fhscn checkpoint_change#, fhafs Absolute_Fuzzy_SCN, max(fhafs) over () Min_PIT_SCN from x$kcvfh where fhafs!=0 ;
Note: Column Min_PIT_SCN will return same value even for multiple rows as we have applied ANALYTICAL "MAX() OVER ()" function on it.
SQL> V$ARCHIVED_LOG
SQL> ALTER SESSION SET NLS_DATE_FORMAT='DD-MON-RR HH24:MI:SS';
SQL> SELECT THREAD#, SEQUENCE#, FIRST_TIME, NEXT_TIME FROM V$ARCHIVED_LOG WHERE '31-AUG-11 23:20:14' BETWEEN FIRST_TIME AND NEXT_TIME;
If the above query does not return any rows, it may be that the information has aged out of the controlfile run the following query against v$log_history.
SQL> V$ LOG_HISTORY view does not have a column NEXT_TIME
SQL> ALTER SESSION SET NLS_DATE_FORMAT='DD-MON-RR HH24:MI:SS';
SQL> select a.THREAD#, a.SEQUENCE#, a.FIRST_TIME from V$LOG_HISTORY a
where FIRST_TIME =
( SELECT MAX(b.FIRST_TIME) FROM V$LOG_HISTORY b
WHERE b.FIRST_TIME < to_date('31-AUG-11 23:20:14', 'DD-MON-RR HH24:MI:SS')
) ;
RMAN> RUN
{
SET UNTIL SEQUENCE 531 THREAD 1;
RECOVER DATABASE;
}
###############################################
###############################################
Mismatch between datafile header scn due to missing archive .
This is case where due to missing archivelogs there is mismatch between checkpoint# of datafiles and below errors is reported
ORA-01194: file 1 needs more recovery to be consistent
ORA-01110: data file 1: '/u03/oradata/tstc/dbsyst01.dbf'
Or:
ORA-01547: warning: RECOVER succeeded but OPEN RESETLOGS would get error below
ORA-01194: file 48 needs more recovery to be consistent
ORA-01110: data file 48: '/vol06/oradata/testdb/ard01.dbf'
Or
ORA-01595: error freeing extent (11) of rollback segment (2))
ORA-600 [4194] The official explanation of the error is: "Undo Record Number Mismatch While Adding Undo Record". When the database increases the UNDO record through REDO recovery, it is found that the number of the UNDO record does not match, that is, there is an inconsistency.
Below was solution adopted for above said problems to force open database
Top open database with resetlogs we need to use below approach .
1) Open database in mount stage
2) Set database _OFFLINE_ROLLBACK_SEGMENTS and _corrupted_rollback_segments . We will rollback segment list from database alert logs .
SQL> alter system set undo_tablespace = undo2 scope=spfile;
System altered.
SQL> alter system set undo_management=auto scope=spfile;
System altered.
8) Take Full backup of database
###############################################
###############################################
Database scn is behind datafile checkpoint# and ORA-00600 is reported .
To put it simply this ORA-00600 error means that a datafile has a recorded SCN that’s ahead of the database SCN. The current database SCN is shown as the 3rd argument (in this case 551715) and the datafile SCN is shown as the 5th argument (in this case 562781). Hence a difference of:
562781 - 551715 = 11066
In this example, that’s not too large of a gap. But in a real system, the difference may be more significant.
Also if multiple datafiles are ahead of the current SCN you should expect to see multiple ORA-00600 errors.
Before 12c one of below options were used , however from 12c patch/event 21307096 has been introduced to advance database scn .
1 : the oradebug Poke directly modify the values in memory;
2 : Event 10015 is to increase the value of scn;
3 : _minimum_giga_scn to increase the value of scn;
4 : GDB / the dbx directly modify the values in memory;
5 : modified values to modify the control file of scn;
6 : modify the data of the file header scn modified value;
One of The solution to this problem is quite simple: roll forward the current SCN until it exceeds the datafile SCN. The database automatically generates a number of internal transactions on each startup hence the way to roll forward the database SCN is to simply perform repeated shutdowns and startups. Depending on how big the gap is, it may be necessary to repeatedly shutdown abort and startup – the gap between the 5th and 3rd parameter to the ORA-00600 will decrease each time. However eventually the gap will reduce to zero and the database will open
-> Alter database open resetlogs ( will fail with ORA-00600: internal error code, arguments: [2663], )
-> Shut abourt
-> Startup
Pre 12c : _minimum_giga_scn
There also another option of setting _minimum_giga_scn which isnot supported from 11.2.0.2.5 .
From past 3 days its failing with the same
reason. ORA-00704: bootstrap process failure ORA-00600: internal error code, arguments:
[2662], [1477], [4214140426], [1477], [4215310734], [4228956], [], [], [], [],
[], [] Error 704 happened during db open, shutting
down database USER (ospid: 3866830): terminating the
instance due to error 70 SQL> select checkpoint_change# from
v$database; SQL> select
ceil(&decimal_scn_expected/1024/1024/1024) from dual; enter the value from the fist select when
prompted Then use those results as follows: set parameter _minimum_giga_scn=<results
from most recent query> in the init.ora file. startup mount recover database alter database open;
Post 12c : applying 21307096 event/patch
From 12c Oracle support introduced applying patch 21307096 to advance database before opening database with resetlogs. This was indirect replacement of _minimum_giga_scn
Below steps can be followed for applying 21307096 event/patch
1. Apply patch 21307096 then:
2. The fix needs to be enabled with Event 21307096 at level SCN delta.
The SCN delta in million units is with the range of values from 1 to 4095 which increases the scn by:
lowest_scn + event level * 1000000
Example: if the lowest datafile checkpoint scn in the database is 990396
and the highest is 992660 then SCN delta is 1; given by (992660 - 990396) / 1000000
event="21307096 trace name context forever, level 1"
or use this query:
select decode(ceil((max(CHECKPOINT_CHANGE#) - min(CHECKPOINT_CHANGE#))/1000000),0,'Event 21307096 is not needed'
, 'event="21307096 trace name context forever, level '
Long back with Oracle 9i, 10.1 and 10.2, whether any specific component needs to be install/deinstall, we need to access OUI. OUI allows these specific request whether enabled/disabled the Oracle component.
In Oracle 11.1, we can remove/deinstall component from already installed Oracle Home using OUI, only if home version is 11.1.0.6 (base release). It is not possible to deinstall/remove compoenent from 11.1.0.7 home – a new change in 11.1 patchset.
In case of 11.1.0.7 or versions which doesn’t support these changes using OUI, over here we can enable/disable the specific component at binary level.
Steps:
1. Shutdown all database instance(s)/service(s) running from the Oracle Database Home
2. Run the following relink command to disable the Oracle Label Security option at the binary level:
% cd $ORACLE_HOME/rdbms/lib
% make -f ins_rdbms.mk lbac_on ioracle
3. Restart the database instance(s) and ensure that “Oracle Label Security” option is turned on i.e TRUE:
SQL> select * from v$option where parameter=’Oracle Label Security’;
PARAMETER VALUE
----------------------- -----------
Oracle Label Security TRUE
Note :
The following are a few of the component options that can be controlled (switch ON or OFF) at the binary level.
Coming up with Oracle 11R2 EE, any specific components can be enabled/disabled with the help of chopt utility. The chopt tool is a command-line utility that is located in the ORACLE_HOME\bin directory.
The syntax for chopt tool:
chopt [ enable | disable] db_option
Usage:
chopt <enable|disable> <option>
options:
dm = Oracle Data Mining RDBMS Files
dv = Oracle Database Vault option
lbac = Oracle Label Security
olap = Oracle OLAP
partitioning = Oracle Partitioning
rat = Oracle Real Application Testing
Steps:
1. Shut down the database SID=orcl with srvctl or SQL*Plus:
srvctl stop database -d myDb -> clusterware env
SQL> shu immediate -> single instance
2. Stop the database service, OracleServiceSID, using the services.msc.
3. Run the following commands:
cd %ORACLE_HOME%/bin
chopt enable lbac
– to enable Oracle Label Security
4. Start the database service, OracleServiceSID, using the services.msc.
5. Start up the database:
srvctl start database -d myDb
SQL> startup
example:
bash-3.00$ chopt enable lbac
Writing to /oracle11g/u01/app/oracle/product/11.2.0/install/enable_lbac.log...
%s_unixOSDMakePath% -f /oracle11g/u01/app/oracle/product/11.2.0/rdbms/lib/ins_rdbms.mk lbac_on
%s_unixOSDMakePath% -f /oracle11g/u01/app/oracle/product/11.2.0/rdbms/lib/ins_rdbms.mk ioracle
s_unixOSDMakePath is nothing but make command
If the output is 0, the option is disabled.
If the output is 1, the option is enabled.
The output are maintained in “$ORACLE_HOME/install/” path
bash-3.00$ pwd
/oracle11g/u01/app/oracle/product/11.2.0/install
bash-3.00$ ls -lrt
-rwxrwxr-x 1 ora11g dba11 259989 Dec 16 21:21 make.log
-rw-r--r-- 1 ora11g dba11 190 Dec 29 18:47 enable_lbac.log
The installed component at the time of oracle home installation can be found in $ORACLE_HOME/install/make.log path.
If we are doing Migration , we need to verify in source what options are enabled and what options are used in database . To check database options were actually used in database check DBA_FEATURE_USAGE_STATISTICS . Oracle uses data from same view during audit for charging you for license . Download and run options_packs_usage_statistics.sql from 1317265.1 for detailed report . By default the feature usage view is updated about once per week. You can force the view to be updated by using the DBMS_FEATURE_USAGE_INTERNAL package.
How to Check and Enable/Disable Oracle Binary Options [ID 948061.1]
How to enable Partitioning in Oracle Database Enterprise Edition 11.2 on Windows [ID 1188238.1]
Database Options/Management Packs Usage Reporting for Oracle Databases 11gR2, 12c, 12cR2 and 18c (Doc ID 1317265.1)
Creating Your First RDS DB Instance Running the Oracle Database Engine
To make the process of setting up your database instances easier, AWS offers an Easy Create option.
This option enables you to create an instance with default settings and configurations for faster deployment.
1. In the AWS Management Console, select the RDS console.
2. Select your desired AWS Region from the
upper right corner. 3. Select Databases and
click Create database.
4. Specify your database options as follows:
Creation method: Standard
Create
Engine options: Oracle
Edition: Select the edition
you wish to use.
Keep in mind that edition availability is restricted by
region.
Version: Select your desired
version.
5. Define how you plan to
use your database instance.
If you want to use the
instance in production you also need to define configurations for
deployment failover, provisioned IOPS storage, and deletion protection.
6. Enter your master
password. This password is automatically generated by default.
If you
would prefer to set this password yourself, you can do the following:
Click Credential Settings in your Settings section.
Uncheck Auto-generate a password.
Enter and confirm your
desired password.
7. Configure your remaining
settings. You can find more about these settings in the documentation. 8. Once your settings are
configured, click Create database. 9. If you left the
auto-generated password option checked, this is the only time you will be
able to see that password so
make sure you note it. You can view this information via View credential details on your Databases page. 10. After your instance is
created you can assign it a name and view all relevant information in the
console.
Amazon RDS Read
Replicas provide
enhanced performance and durability for database (DB) instances.
Its option for scaling .
Cross-region
read replicas can yield tremendous performance benefits for read-only
applications for users based out in multiple regions. This feature gives
organizations to scale geographically as AWS has its services in many regions
of the world. Amazon RDS allows up to five in-region and cross-region replicas
per source with a single API call or a couple of clicks in the AWS Management
Console.
Common use cases for
cross-region read replicas can best be described as cross-region disaster
recovery model, scale out globally, or migrate an existing database to a new
region. Let’s examine the benefits:
Disaster recovery: Having the read replica
and the master on different regions, you will be able to promote the replica to
the new master in case a region gets completely disrupted due to unavoidable
circumstances. This helps keep the business operational during emergencies.
Scale out globally: If your application has a
user base that is spread out all over the planet, you can use cross-region read
replicas to serve read queries from an AWS region that is close to the user.
Region migration: Cross-region read
replicas make it easy for you to migrate your application from one AWS region
to another. Simply create the replica, ensure that it is current, promote it to
be a master database instance, and point your application to it. The cross-region replicas
are very easy to create. You simply select the desired region (and optional
availability zone) in the AWS
Management Console from
the Instance Actions menu.
Before we proceed to create read replica we need to create VPC and subnet group as per requirement .
Benefits of Read Replicas
Read Replicas helps in decreasing load on the primary DB by serving read-only traffic.
You can create Read Replicas within AZ, Cross-AZ or Cross-Region.
Read Replica can be manually promoted as a standalone database instance.
Read Replicas support Multi-AZ deployments.
You can use Read Replicas to take logical backups, if you want to store the backups externally to RDS.
You can have Read Replicas of Read Replicas.
Read Replica helps to maintain a copy of databases in a different region for disaster recovery.
You can have up to five Read Replicas per master, each with own DNS endpoint. Unlike a Multi-AZ standby replica, you can connect to each Read Replica and use them for read scaling.
You'll be prompted to log in with your own Amazon credentials first.
IAM is Amazons access management system, in it you can create users with access to as much or little of your amazon AWS account as you like.
2) Click Create New Users Enter a username which makes sense. Like Firstname.Lastname or FirstnameL Click create for the user. Don't bother generating Access Keys for this new user, they can generate their own later on.
3) Give the new user Administrator Access
You've created the new user, here called "test.jim" let's give them Administrator Access
Select the user from the list of users on the screen
Click the "Permissions" tab that appears in the pane below the users list
Click the "attach user policy" button in that "permissions" tab.
4) Select Administrator Access
5) Apply the policy
Leave the suggested permissions at their defaults, and click "Apply Policy"
6) Give your teammate a password
Click on the "Security Credentials" tab next to the "Permissions" one you were using earlier.
7) Copy the password to your teammate
Either on the phone, a piece of paper on their desk, or in an Instance Message. They should change their password soon after you give it to them
8) Provide instructions to your teammate for logging in
Your teammate will need some instructions for logging into your management console.
The login url for your AWS account is located on your dashboard. From the image below:
1. Click the Dashboard link (1) to get to your dashboard
2. Write down the sign in url for your AWS console (2)
9) Customize the Sign In Url
You can customize the URL by giving it a name that is familiar, like your company name.
Afterwards the link will look like this:
10) Tell your employee the username + password + sign in url
Your employee will need the Username, password and sign in URL that you created in order to log in. They cannot log in on the normal Amazon website, they must use
the special sign in url that you give them.
When they visit the link it will look like the below.
Congratulations you've just added an administrator to your Amazon AWS account!
Bonus email or instant message template to send your teammate - just change the bits in bold
-----
Hi Test Jim,
I've given you Administrator Access to the company Amazon AWS account.
Username: test.jim
Password: ********
Sign In URL: https://whit.signin.aws.amazon.com/console
Please bookmark and use the Sign In URL to access our company AWS console in future.
Also please change your password to something more secure once inside.
Changing database parameter using parameter group .
As we know that alter system commands are not allowed in aws rds . Changing of database parameter can be achieved using parameter groups .
To modify a DB parameter group
Sign in to the AWS Management Console and open the Amazon RDS console at https://console.aws.amazon.com/rds/.
In the navigation pane, choose Parameter groups.
In the list, choose the parameter group that you want to modify.
For Parameter group actions, choose Edit.
Change the values of the parameters that you want to modify. You can scroll through the parameters using the arrow keys at the top right of the dialog box.
You can't change values in a default parameter group.
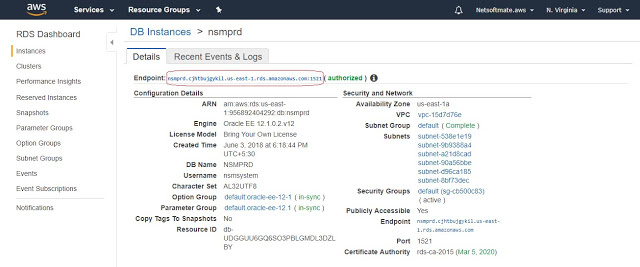
1) Get endpoint details for database from aws console .
Sign in to the AWS Management Console and open the Amazon RDS console at https://console.aws.amazon.com/rds/.
In the upper-right corner of the console, choose the AWS Region of your DB instance.
Find the DNS name and port number for your DB Instance.
Choose Databases to display a list of your DB instances.
Choose the Oracle DB instance name to display the instance details.
On the Connectivity & security tab, copy the endpoint. Also, note the port number. You need both the endpoint and the port number to connect to the DB instance.
2) Check security group and add rules to VPC security group. While Database instance creation if it is default security group then this instance firewall prevents connections.
For you to connect to your DB instance, it must be associated with a security group that contains the IP addresses and network configuration that you use to access the DB instance. You might have associated your DB instance with an appropriate security group when you created it. If you assigned a default, non configured security group when you created the DB instance, the DB instance firewall prevents connections.
If you need to create a new security group to enable access, the type of security group that you create depends on which Amazon EC2 platform your DB instance is on. To determine your platform, see Determining whether you are using the EC2-VPC or EC2-Classic platform. In general, if your DB instance is on the EC2-Classic platform, you create a DB security group; if your DB instance is on the VPC platform, you create a VPC security group. For information about creating a new security group, see Controlling access with security groups.
After you create the new security group, you modify your DB instance to associate it with the security group. For more information, see Modifying an Amazon RDS DB instance.
You can enhance security by using SSL to encrypt connections to your DB instance. For more information, see Oracle Secure Sockets Layer.
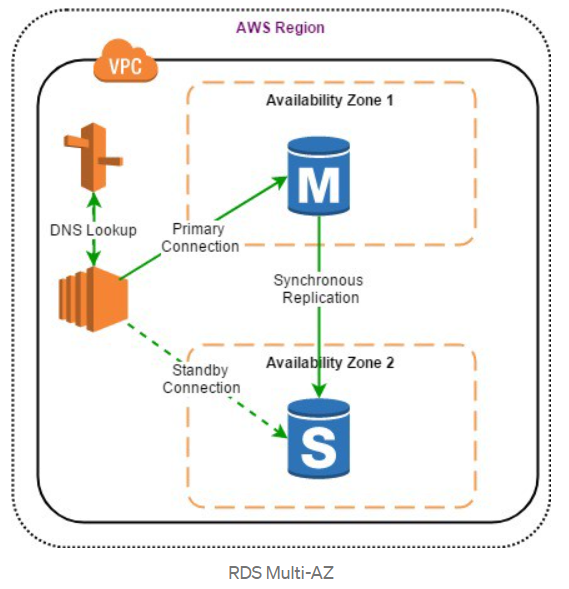
When Multi-AZ is enabled for MySQL, MariaDB,
Oracle, and PostgreSQL engines, AWS automatically provisions and maintains a
synchronous database standby replica on a dedicated hardware in a separate data
center (known as Availability Zone, or AZ). When deploying SQL Server in a Multi-AZ infrastructure, a
SQL server engine can be configured to use SQL-Server native mirroring
technology for synchronous logical replication. AWS RDS will automatically
switch from the primary instance to the available standby replica in the event
of a failure, such as an Availability Zone outage, an internal hardware or
network outage, a software failure; or in case of planned interruptions, such
as software patching or changing the RDS instance type.
SSDs
are not only durable in terms of read and write throughput, but also
cost-effective, high-performance robust storage devices for database workloads.
Amazon Aurora/RDS uses SSD-backed virtual storage layer for all its database
services. Amazon Aurora automatically replicates the storage volume six ways
across three Availability Zones, making it extremely durable and fault-tolerant.
Multi-AZ
increases durability and availability of the databases and is most suitable for
production deployments. If an Availability Zone failure or DB instance failure
occurs, the availability impact is limited to the time automatic failover takes
to complete, which is typically under one minute for Amazon Aurora and one to
two minutes for other database engines. When operations such as DB instance
scaling or system upgrades such as OS patching are initiated for Multi-AZ
deployments, it is applied on the standby prior to an automatic failover. As a
result, the availability impact is limited only to the time required for
automatic failover to complete.
Benefits of Multi-AZ deployment:
Replication to a standby replica is synchronous which is highly durable.
Endpoint of DB instance remains the same after a failover, the application can resume database operations without manual intervention.
If a failure occurs, your availability impact is limited to time that automatic failover takes to complete. This helps to achieve increased availability.
It reduces the impact of maintenance. RDS performs maintenance on the standby first, promotes the standby to primary master, and then performs maintenance on the old master which is now a standby replica.
To prevent any negative impact of the backup process on performance, Amazon RDS creates a backup from the standby replica.
When a problem is detected on the primary instance, it will automatically failover to the standby in the following conditions: 1) The primary DB instance fails. 2) An Availability Zone outage. 3) The DB instance server type is changed. 4) The operating system of DB instance is undergoing software patching. 5) Manual failover of DB instance was initiated using reboot with failover.
Note :
1) Cross-region Multi-AZ is not yet supported .
2) Multi-AZ deployments are not a read scaling solution, you cannot use a standby replica to serve read traffic. The standby is only there for failover
Ensure that RDS database instances have automated
backups enabled for point-in-time recovery. To back up your database instances,
RDS take automatically a full daily snapshot of your data, with transaction
logs, during the specified backup window and keeps the backups for a limited
period of time (known as retention period) defined by the instance owner.
RDS creates a storage volume snapshot of the DB instance, backing up the entire DB instance and not just individual databases.
RDS provides two different methods Automated and Manual for backing up your DB instances .
Automated Backups:
Backups of the DB instance are automatically created and retained
Automated backups are enabled by default for a new DB instance.
Automated backups occur during a daily user-configurable period of time, known as preferred backup window.
If a preferred backup window is not specified when an DB instance is created, RDS assigns a default 30-minute backup window which is selected at random from an 8-hour block of time per region.
Changes to the backup window take effect immediately.
Backup window cannot overlap with the weekly maintenance window for the DB instance.
Backups created during the backup window are retained for a user-configurable number of days , known as backup retention period
If the backup retention period is not set, RDS defaults the period retention period to one day, if created using RDS API or the AWS CLI, or seven days if created AWS Console
Backup retention period can be modified with valid values are 0 (for no backup retention) to a maximum of 35 days.
Manual snapshot limits (50 per region) do not apply to automated backups
If the backup requires more time than allotted to the backup window, the backup will continue to completion.
An immediate outage occurs if the backup retention period is changed
from 0 to a non-zero value as the first backup occurs immediately or
from non-zero value to 0 as it turns off automatic backups, and deletes all existing automated backups for the instance.
RDS uses the periodic data backups in conjunction with the transaction logs to enable restoration of the DB Instance to any second during the retention period, up to the LatestRestorableTime (typically up to the last few minutes).
During the backup window,
for Single AZ instance, storage I/O may be briefly suspended while the backup process initializes (typically under a few seconds) and a brief period of elevated latency might be experienced.
for Multi-AZ DB deployments, there is No I/O suspension since the backup is taken from the standby instance
First backup is a full backup, while the others are incremental.
Automated DB backups are deleted when
the retention period expires
the automated DB backups for a DB instance is disabled
the DB instance is deleted
When a DB instance is deleted,
a final DB snapshot can be created upon deletion; which can be used to restore the deleted DB instance at a later date.
RDS retains the final user-created DB snapshot along with all other manually created DB snapshots
all automated backups are deleted and cannot be recovered
Point-In-Time Recovery
In addition to the daily automated backup, RDS archives database change logs. This enables recovery of the database to any point in time during the backup retention period, up to the last five minutes of database usage.
Disabling automated backups also disables point-in-time recovery
RDS stores multiple copies of your data, but for Single-AZ DB instances these copies are stored in a single availability zone.
If for any reason a Single-AZ DB instance becomes unusable, point-in-time recovery can be used to launch a new DB instance with the latest restorable data
DB Snapshots (User Initiated – Manual)
DB snapshots are manual, user-initiated backups that enables to back up a DB instance to a known state, and restore to that specific state at any time
RDS keeps all manual DB snapshots until explicitly deleted
1) Sign in to the AWS Management Console and open the Amazon RDS console at https://console.aws.amazon.com/rds/. 2) In the navigation pane, choose Snapshots. 3) Choose the DB snapshot that you want to restore from. 4) For Actions, choose Restore Snapshot. Note: This will create a new instance with the existing configuration of the instance from which the snapshot has been taken 5) On the Restore DB Instance page, for DB Instance Identifier, enter the name for your restored DBinstance. 6) Choose Restore DB Instance.
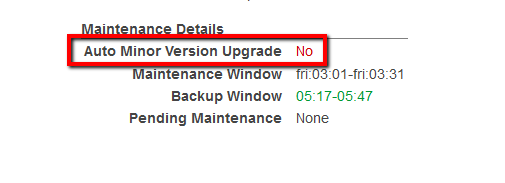
A minor version upgrade applies an Oracle Database Patch Set Update (PSU) or Release Update (RU) in a major version.
An Amazon RDS for Oracle DB instance is scheduled to be upgraded automatically during its next maintenance window when it meets the following condition:
The DB instance has the Auto minor version upgrade option enabled.
The DB instance is not running the latest minor DB engine version.
03In the navigation panel, under RDS Dashboard, click Instances.
04Select the RDS instance that you want to examine.
05Click Instance Actions button from the dashboard top menu and select See Details.
06Under Maintenance Details section, search for the Auto Minor Version Upgrade status:
If the current status is set to No, the feature is not enabled and the minor engine upgrades released will not be applied to the selected RDS instance.
07Repeat steps no. 4 – 6 for each RDS instance provisioned in the current region. Change the AWS region from the navigation bar to repeat the process for other regions
Complianceis one of the key concerns for
DBAs whose data is on the cloud. When dealing with production databases that
hold sensitive and critical data, it is highly recommended to implement
encryption in order to protect the data from unauthorized access. With RDS
encryption enabled, the data stored on the instance underlying storage, the
automated backups, read replicas, and snapshots all become encrypted. The RDS
encryption keys implement the AES-256 algorithm and are entirely managed and
protected by the AWS key management infrastructure through AWS Key Management
Service (AWS KMS).
Options for encryption of data
at rest provided by AWS are as listed below: RDS for Oracle Database –
AWS-managed keys for Oracle Enterprise Edition (EE) RDS for SQL Server – AWS-managed
keys for SQL Server Enterprise Edition (EE)
RDS for MySQL – Customer-managed
keys using AWS Key Management Service (KMS) RDS for PostgreSQL –
Customer-managed keys using AWS Key Management Service (KMS) RDS for Oracle Database –
Customer-managed keys for Oracle Enterprise Edition using AWS CloudHSM
For all of the above-listed
database engines and key management options, encryption (AES-256) and
decryption are applied both automatically and transparently to RDS storage and
database snapshots. You do not need to make any changes to your code or
operating model in order to benefit from this important data protection
feature. AWS
CloudHSM is
a service that helps meet stringent compliance requirements for cryptographic
operations and storage of encryption keys by using a single tenant Hardware Security Module (HSM) appliances within the AWS
cloud. To learn more, read the documentation onEncrypting
RDS Resources
Ensure that RDS database instances are encrypted to
fulfill compliance requirements for data-at-rest encryption. The RDS data
encryption and decryption is handled transparently and don’t require any
additional action from you or your application, you just need to select the
Master Key which is going to encrypt the instance.
To enable data encryption for an existing RDS instance
you need to re-create it (back-up and restore) with encryption flag enabled, as
you can see below:
Go
to the RDS console and select the region your database is in. Click on the Show Monitoring button and pick your
database instance. There will be a graph (like below image) that shows Free Storage Space.
Enter a new value for Allocated storage.
It must be greater than the current value.
Choose Continue to move to the next screen.
Choose Apply immediately in the Scheduling of modifications section to apply the storage changes to the DB instance immediately. Or choose Apply during the next scheduled maintenance window to apply the changes during the next maintenance window.
When the settings are as you want them, choose Modify DB instance
Note
When
you increase the allocated storage, it must be by at least 10 percent. If you
try to increase the value by less than 10 percent, you get an error.
AWS DMS can help DBAs in planning and migration of on-premises
relational data stored in Oracle, SQL Server, MySQL, MariaDB, or PostgreSQL
databases. DMS can help in migrating to cloud in virtually no downtime so you
can take advantage of the scale, operational efficiency, and the multitude of
data storage options available. DMS works by setting up and then managing a
replication instance on AWS. This instance unloads data from the source
database and loads it into the destination database, and can be used for a
one-time migration followed by ongoing replication to support a migration that
entails minimal downtime. DBAs can set up their first migration with just a
couple of clicks. The process can be started by DMS Console as shown below:
It provides a
step-by-step process to set up the migration. The screenshot below gives an
overview of the entire process.
What each step means: DMS requires at least a source,
a target, and a replication instance.
Source database: An on-premises or EC2
instance-based database.
Target database: Target database is the actual
AWS RDS database to which the source database has to be migrated.
Replication instance: Processes the migration
tasks.
Replication task: Once configuration of the
source database and target databases using connection details like DB name,
hostname, port, username, and password is completed, the replication tasks are
created. It contains one or more table mappings that define what data is being
moved from the source to the target. If a table does not exist in the target,
then it can be automatically created. The AWS Database Migration Service offers
many options. For example, you can choose to migrate specific tables. You can
also create several different types of replication tasks and activate them at
different times. Step-by-stepDMS
documentation can
be very useful before starting the process
Monitoring is an important part of maintaining the reliability,
availability, and performance of Amazon RDS or any database system. DBAs need
to put a plan in place to oversee databases on RDS in order to monitor network
throughput, I/O for read, write, or metadata operations, client connections,
and keep track of historical performance KPIs to use as a baseline for
comparison with current performance. Additionally, Amazon RDS provides multiple
ways to manage automation of many DBA activities and has many different
capabilities to do detailed performance analysis of the overall system. Let’s
look at some of the monitoring techniques that Amazon RDS provides.
Using Amazon CloudWatch, DBAs can automate most monitoring
tasks. CloudWatch collects and processes raw data from Amazon RDS into
readable, near real-time metrics. These statistics are recorded for a period of
two weeks so DBAs can maintain a historical performance statistics of
databases. Using AWS Console, DBAs can find the metrics related to
RDS. The screenshot below shows how many RDS metrics produced by database engines can
be monitored.
You can also use
CloudWatch Alarms for single metrics to take actions such as sending a
notification to a concerned person or autoscaling policies, which in turn may
automatically handle an increase in load by adding additional resources.
Enhanced Monitoring
Advanced RDS DBAs may
want to have more insight into the inner workings of database services. Once
the RDS Enhanced Monitoring feature for a database instance is enabled, DBAs
gain access to more than 50 new CPU, memory, file system, and disk I/O metrics.
DBAs can enable these features on a per-instance basis and can choose the
granularity (all the way down to one second). Here is the list of available
metrics:
Deletion protection is now enabled by default when you select the "production" option for database instances created through the AWS Console. You can also turn on or off deletion protection for an existing database instance or cluster with a few clicks in the AWS Console or the AWS Command Line Interface. Deletion protection is enforced in the AWS Console, the CLI, and API.
Check for any public RDS database instances provisioned
in your AWS account and restrict unauthorized access in order to minimize
security risks. To restrict access to any publicly accessible RDS database
instance, you must disable the database Publicly Accessible flag
and update the VPC security group associated with the instance, as you can see
below:
This feature allows RDS Oracle customers to easily, efficiently and securely transfer data between their RDS Oracle DB Instances and Amazon S3.
Previously, data transfers from an RDS Oracle DB Instance required an additional DB Instance and a networking link between the two DB Instances. With Amazon S3 Integration, you can now use the RDS Oracle DB instance to transfer files to or from Amazon S3 using new RDS Oracle procedures.
With Amazon S3 Integration, you can perform data ingress with Oracle Data Pump to migrate workloads into your RDS Oracle DB Instance. After exporting your data from your source instance, you upload your Data Pump files to your Amazon S3 bucket. You can then copy the files from your S3 bucket to the RDS Oracle host and finally use the DBMS_DATAPUMP package to import your data into the target RDS Oracle DB Instance.
To work with Amazon RDS for Oracle integration with Amazon S3, the Amazon RDS DB instance must have access to an Amazon S3 bucket. For this, you create an AWS Identity and Access Management (IAM) policy and an IAM role. The Amazon VPC used by your DB instance doesn't need to provide access to the Amazon S3 endpoints.
Note
To add a role to a DB instance, the status of the DB instance must be available.
Please refer Aws document below for creatng iam policy for s3 access
You have the option to include the cost of the Oracle Database license in the hourly price of the Amazon RDS service if you use the License Included service model. In this case, you do not need to purchase Oracle licenses separately; the Oracle Database software has been licensed by AWS. License Included per-hour pricing includes software, underlying hardware resources, and Amazon RDS management capabilities. This service model optimizes license costs, and gives you flexibility when scaling your Amazon RDS instances up or down. You can take advantage of hourly pricing with no upfront fees or long-term commitments. In addition, you can purchase Amazon RDS Reserved Instances under one-year or three-year reservation terms. With Reserved Instances, you can make a low, one-time payment up front for each database instance, and then pay a significantly discounted hourly usage rate.
Note: The hourly license for the License Included model in Amazon RDS is available only for Oracle Standard Edition One and Standard Edition Two. For other editions of Oracle Database on Amazon RDS and any edition of Oracle Database on Amazon EC2, you need to use your own license (that is, acquire a license from Oracle), as discussed in the following section.
— Full RMAN database Backup in RDS: SQL> BEGIN
rdsadmin.rdsadmin_rman_util.backup_database_full(
p_owner => ‘SYS’,
p_directory_name =>
‘BKP_DIR’,
p_level =>
0, — 0 For FULL, 1 for
Incremental
–p_parallel =>
4, — To be hashed if using a
Standard Edition
p_section_size_mb => 10, p_rman_to_dbms_output => TRUE); END; / — Backup ALL ARCHIVELOGS: SQL> BEGIN
rdsadmin.rdsadmin_rman_util.backup_archivelog_all(
p_owner =>
‘SYS’,
p_directory_name =>
‘BKP_DIR’,
–p_parallel => 6, — To be hashed if using a
Standard Edition
p_rman_to_dbms_output => TRUE); END; / — Backup ARCHIVELOGS between a date range: SQL> BEGIN
rdsadmin.rdsadmin_rman_util.backup_archivelog_date(
p_owner => ‘SYS’,
p_directory_name => ‘BKP_DIR’,
p_from_date =>
’01/15/2020 00:00:00′,
p_to_date =>
’01/16/2020 00:00:00′,
–p_parallel =>
4, — To be hashed if using a
Standard Edition
p_rman_to_dbms_output => TRUE); END; / Note: in case of using SCN/sequence replace “p_from_date”
with “p_from_scn” or “p_from_sequence” and “p_to_date” with “p_to_scn” or
“p_to_sequence”. — Show Running RMAN Backups: [Manual backups running by
you not by RDS as RDS is using Hot Backup method to backup the DB] SQL> SELECT
to_char (start_time,’DD-MON-YY HH24:MI’) START_TIME,
to_char(end_time,’DD-MON-YY HH24:MI’) END_TIME, time_taken_display, status, input_type, output_device_type,input_bytes_display,
output_bytes_display, output_bytes_per_sec_display,COMPRESSION_RATIO
COMPRESS_RATIO FROM v$rman_backup_job_details WHERE status like ‘RUNNING%’; — Show current Running Hot Backups: SQL> SELECT t.name AS “TB_NAME”, d.file# as “DF#”,
d.name AS “DF_NAME”, b.status FROM V$DATAFILE d, V$TABLESPACE t, V$BACKUP b WHERE d.TS#=t.TS# AND b.FILE#=d.FILE# AND b.STATUS=’ACTIVE’; — Validate the database for Physical/Logical corruption
on RDS: SQL> BEGIN rdsadmin.rdsadmin_rman_util.validate_database(
p_validation_type =>
‘PHYSICAL+LOGICAL’,
–p_parallel =>
2, — To be hashed if running
a Standard Edition
p_section_size_mb => 10, p_rman_to_dbms_output
=> TRUE); END; / — Enable BLOCK CHANGE TRACKING on RDS: [Avoid enabling it
on 11g as you will hit a bug will hamper you from restoring the database later
consistently] SQL> SELECT status, filename FROM
V$BLOCK_CHANGE_TRACKING; SQL> EXEC
rdsadmin.rdsadmin_rman_util.enable_block_change_tracking; — Disable BLOCK CHANGE TRACKING on RDS: SQL> EXEC
rdsadmin.rdsadmin_rman_util.disable_block_change_tracking; — Crosscheck and delete expired ARCHIVELOGS: [Which are
not exist anymore on disk] SQL> EXEC
rdsadmin.rdsadmin_rman_util.crosscheck_archivelog(p_delete_expired => TRUE,
p_rman_to_dbms_output => TRUE);
In case you have a corrupted blocks on a table/index
whenever any query try to access those corrupted blocks it will keep getting
ORA-1578 From the error message try to find the corrupted
object_name and its owner : SQL> Select
relative_fno,owner,segment_name,segment_type from dba_extents where file_id = <DATAFILE_NUMBER_IN_THE_ERROR_MESSAGE_HERE> and <CORRUPTED_BLOCK_NUMBER_IN_THE_ERROR_MESSAGE_HERE>
between block_id and block_id + blocks – 1; Next follow the next steps to SKIP the corrupted blocks
on the underlying object to allow queries running against to succeed: — Create REPAIR tables: exec rdsadmin.rdsadmin_dbms_repair.create_repair_table; exec
rdsadmin.rdsadmin_dbms_repair.create_orphan_keys_table; exec rdsadmin.rdsadmin_dbms_repair.purge_repair_table; exec
rdsadmin.rdsadmin_dbms_repair.purge_orphan_keys_table; — Check Corrupted blocks on the corrupted object and
populate them in the REPAIR tables: set serveroutput on declare v_num_corrupt int; begin v_num_corrupt :=
0;
rdsadmin.rdsadmin_dbms_repair.check_object ( schema_name
=> ‘&corrupted_Object_Owner’, object_name
=> ‘&corrupted_object_name’, corrupt_count
=> v_num_corrupt ); dbms_output.put_line(‘number corrupt:
‘||to_char(v_num_corrupt)); end; / col corrupt_description format a30 col repair_description format a30 select object_name, block_id, corrupt_type,
marked_corrupt, corrupt_description, repair_description from sys.repair_table; select skip_corrupt from dba_tables where owner =
upper(‘&corrupted_Object_Owner’) and table_name = upper(‘&corrupted_object_name’);
— Enable the CORRUPTION SKIPPING on the corrupted object: begin
rdsadmin.rdsadmin_dbms_repair.skip_corrupt_blocks ( schema_name
=> ‘&corrupted_Object_Owner’, object_name
=> ‘&corrupted_object_name’, object_type
=> rdsadmin.rdsadmin_dbms_repair.table_object, flags =>
rdsadmin.rdsadmin_dbms_repair.skip_flag); end; / select skip_corrupt from dba_tables where owner = upper(‘&corrupted_Object_Owner’) and
table_name = upper(‘&corrupted_object_name’); — Disable the CORRUPTION SKIPPING on the corrupted
object: begin
rdsadmin.rdsadmin_dbms_repair.skip_corrupt_blocks ( schema_name
=> ‘&corrupted_Object_Owner’, object_name
=> ‘&corrupted_object_name’, object_type
=> rdsadmin.rdsadmin_dbms_repair.table_object, flags =>
rdsadmin.rdsadmin_dbms_repair.noskip_flag); end; / select skip_corrupt from dba_tables where owner = upper(‘&corrupted_Object_Owner’) and
table_name = upper(‘&corrupted_object_name’); — Finally DROP the repair tables: exec rdsadmin.rdsadmin_dbms_repair.drop_repair_table; exec
rdsadmin.rdsadmin_dbms_repair.drop_orphan_keys_table;
After moving to AWS we need to perform all task using rdsadmin utility . Though some task works traditional way its recommended to perform all tsk using rdsadmin
Killing Session :
begin rdsadmin.rdsadmin_util.kill( sid => &sid, serial => &serial, method => 'IMMEDIATE'); end; /
begin
rdsadmin.rdsadmin_password_verify.create_verify_function(
p_verify_function_name => 'CUSTOM_PASSWORD_FUNCTION',
p_min_length => 12,
p_min_uppercase => 2,
p_min_digits => 1,
p_min_special => 1,
p_disallow_at_sign =>
true); end; / col text format a150 select TEXT from DBA_SOURCE where OWNER = 'SYS' and NAME = 'CUSTOM_PASSWORD_FUNCTION' order by LINE;
Changing database archivelog retention:
begin
rdsadmin.rdsadmin_util.set_configuration( name => 'archivelog retention hours', value =>
'24'); end; /
commit /
set serveroutput on exec rdsadmin.rdsadmin_util.show_configuration
EXEC rdsadmin.manage_tracefiles.refresh_tracefile_listing; SELECT * FROM rdsadmin.tracefile_listing; or SELECT * FROM TABLE(rdsadmin.rds_file_util.listdir('BDUMP'));
Checking database listener log and alert log :
set markup html on spool
on SPOOL listener_log.HTML set echo on select
ORIGINATING_TIMESTAMP,MESSAGE_TEXT from listenerlog where ORIGINATING_TIMESTAMP >= TO_DATE
(‘2018-05-31,12:01:56’, ‘yyyy-mm-dd, hh24:mi:ss’) AND ORIGINATING_TIMESTAMP
< TO_DATE (‘2018-06-01, 12:01:56’, ‘yyyy-mm-dd, hh24:mi:ss’) order by
originating_timestamp ; spool off set markup html off spool
off
set markup html on spool on
SPOOL alert_log.HTML set echo on select ORIGINATING_TIMESTAMP,MESSAGE_TEXT from alertlog
where upper(message_text) like ‘%ORA-60%’ and ORIGINATING_TIMESTAMP >=
TO_DATE (‘2018-05-31,12:01:56’, ‘yyyy-mm-dd, hh24:mi:ss’) AND ORIGINATING_TIMESTAMP < TO_DATE (‘2018-06-01,
12:01:56’, ‘yyyy-mm-dd, hh24:mi:ss’) order by originating_timestamp ; spool off set markup html off spool off
select message_text from ALERTLOG where rownum<=10 order by indx;
or
SQL> SELECT text FROM table(rdsadmin.rds_file_util.read_text_file('BDUMP','alert_TECHDATABASKET.log'));
SELECT text FROM table(rdsadmin.rds_file_util.read_text_file('BDUMP','alert_MYDB.log')) where rownum<=10;